Add browser login to your MCP server
In this example we run a ticket server with browser login. For an introduction to its tools, see Build an MCP server with TypeScript. A support agent signs in through Claude Code or Codex and chooses whether the client can read tickets, close them, or both.
To run Ory Hydra Authorization on your own infrastructure, follow the OEL guide or open-source guide.
Ory Network hosts the login and consent pages, and Ory Hydra Authorization issues the access token that the client sends with each MCP request. Your server checks the token and its granted permissions, called scopes, before running a tool. First, grant read access and confirm that closing a ticket fails. Then grant write access and close it.
If your application already has user accounts, you can connect Ory Hydra Authorization to your existing login instead of using the hosted pages.
Prerequisites
Install the Ory CLI, curl, and jq.
Use a terminal window or tab for setup and running the server. The steps below call this the server terminal.
Get the example
Install Git, Node.js 22.19 or later, and npm. Use a terminal running Bash or Zsh for setup and running the server.
Clone the examples once. If you already cloned them for another MCP guide, stop its server, remove its client connection, and
return to the ory-docs repository root instead of cloning again:
git clone --depth 1 --filter=blob:none --sparse --branch master \
  https://github.com/ory/docs.git ory-docs
cd ory-docs
git sparse-checkout set code-examples/mcp-auth
Open the complete example and select its
directory. The commands also create a private .env file for this example's settings:
cd code-examples/mcp-auth/typescript/oauth
umask 077
touch .env
Keep this directory open in your server terminal. Run the remaining commands here; each example has its own configuration.
Install this example's dependencies:
npm install
1. Configure Ory Network
Save your project settings in .env. The server loads this file whenever it starts. The setup commands below create a project and
save its settings with this structure:
.env (example)
ORY_PROJECT_ID="<project ID>"
ORY_SDK_URL="https://<project slug>.projects.oryapis.com"
Create the project and save its settings once
In the server terminal, run ory auth to sign in with the Ory CLI, then create a development project. Select your workspace when
prompted. The commands save the project ID and URL in .env. The example's .gitignore already excludes this file:
ory auth
ory create project --name "Ticket MCP tutorial" --environment dev --use-project --format json > project.json
printf 'ORY_PROJECT_ID="%s"\nORY_SDK_URL="https://%s.projects.oryapis.com"\n' \
  "$(jq -er '.id' project.json)" "$(jq -er '.slug' project.json)" > .env
. ./.env
Configure the project's OAuth service so clients can register automatically and request access tokens for your MCP server:
. ./.env
ory patch oauth2-config --project "$ORY_PROJECT_ID" \
  --add '/feature_flags/resource_indicators_enabled=true' \
  --add '/oidc/dynamic_client_registration={"enabled":true,"default_audience":["http://127.0.0.1:18480/mcp"],"default_scope":["tickets:read","tickets:write","offline_access"]}' \
  --add "/webfinger/oidc_discovery/client_registration_url=\"$ORY_SDK_URL/oauth2/register\"" \
  --add '/strategies/access_token="jwt"' --format json > oauth-config.json
The configuration controls registration and access tokens:
- Each MCP client registers automatically with your project when a user first signs in. This is called dynamic client registration (DCR). The project publishes the registration URL so clients can find it.
- The resource URL identifies the server that accepts a token. New registrations receive this URL as their default audience, and clients can request it using resource indicators, defined in RFC 8707.
- The project issues JSON Web Tokens (JWTs), which your server verifies using the project's public keys.
New clients can request tickets:read, tickets:write, and offline_access. The user chooses which permissions to grant on the
consent screen. You don't need to copy a client ID or manage callback URLs.
| Value | Purpose |
|---|---|
Client ID (client_id) | Identifies the application requesting access, such as Claude Code or Codex. |
Resource audience (aud) | Identifies the server allowed to accept the token: http://127.0.0.1:18480/mcp. |
| Permission scopes | Identify the operations the user allowed, such as reading or closing tickets. |
Use the same resource URL in the project defaults, the client connection, the server's discovery metadata, and the token verifier. The discovery metadata tells clients which authorization server to use.
2. Validate tokens and enforce scopes
The following blocks include the complete source files. Highlighted lines connect the configuration, token verification, and permission checks; the surrounding code shows how they fit together.
Connect to your Ory project
auth.ts reads your project URL from
.env and fetches the project's OAuth settings from /.well-known/openid-configuration. This discovery document includes the
endpoints used for login and token verification.
import { createOAuthVerifier } from "./verifier.js"

export async function loadOAuthSettings() {
  const projectUrl = process.env.ORY_SDK_URL!
  const resource = new URL("http://127.0.0.1:18480/mcp")

  const response = await fetch(
    `${projectUrl}/.well-known/openid-configuration`,
    { signal: AbortSignal.timeout(5000) },
  )
  if (!response.ok) throw new Error("OAuth discovery failed")
  const metadata = await response.json()

  const verifier = createOAuthVerifier({
    projectUrl,
    issuer: metadata.issuer,
    resource: resource.href,
  })

  return { resource, metadata, verifier }
}
Validate the token
verifier.ts verifies the token's
signature using your project's public keys. It also checks who issued the token, when it expires, and whether its audience
includes this MCP server. If the checks pass, it returns the granted scopes.
import {
  OAuthError,
  OAuthErrorCode,
  type OAuthTokenVerifier,
} from "@modelcontextprotocol/server"
import { createRemoteJWKSet, jwtVerify } from "jose"

export function createOAuthVerifier(settings: {
  projectUrl: string
  issuer: string
  resource: string
}): OAuthTokenVerifier {
  // The key set caches Ory’s public signing keys and refreshes them after rotation.
  const jwks = createRemoteJWKSet(
    new URL(`${settings.projectUrl}/.well-known/jwks.json`),
  )

  return {
    async verifyAccessToken(token) {
      try {
        const { payload } = await jwtVerify<{
          client_id: string
          scp?: string[]
          scope?: string
        }>(token, jwks, {
          issuer: settings.issuer,
          audience: settings.resource,
          algorithms: ["RS256", "ES256"],
          requiredClaims: ["exp", "sub", "client_id"],
        })

        if (
          typeof payload.sub !== "string" ||
          !payload.sub ||
          typeof payload.client_id !== "string" ||
          !payload.client_id
        ) {
          throw new Error("Unexpected token identity")
        }

        // The subject identifies the user; client_id identifies their OAuth application.
        return {
          token,
          clientId: payload.client_id,
          scopes: payload.scp ?? payload.scope?.split(" ") ?? [],
          expiresAt: payload.exp,
          extra: { subject: payload.sub },
        }
      } catch {
        throw new OAuthError(
          OAuthErrorCode.InvalidToken,
          "Invalid access token",
        )
      }
    },
  }
}
Check each tool's scope
server.ts handles three steps:
- Check
tickets:readandtickets:write. Without the required scope, the tool returnsForbiddenbefore reading or changing a ticket. - Use
mcpAuthMetadataRouterto tell the client where to start browser login. - Use
requireBearerAuthto check the access token before a request reaches the MCP handler. Tool handlers receive the verified scopes inauthInfo.
import "dotenv/config"
import {
  McpServer,
  createMcpHandler,
  type AuthInfo,
} from "@modelcontextprotocol/server"
import { toNodeHandler } from "@modelcontextprotocol/node"
import {
  createMcpExpressApp,
  mcpAuthMetadataRouter,
  getOAuthProtectedResourceMetadataUrl,
  requireBearerAuth,
} from "@modelcontextprotocol/express"
import * as z from "zod"
import { getTicket, closeTicket } from "./tickets.js"
import { loadOAuthSettings } from "./auth.js"

const { resource, metadata, verifier } = await loadOAuthSettings()

const failure = (text: string) => ({
  isError: true,
  content: [{ type: "text" as const, text }],
})

// Each request gets tool handlers bound to its caller’s verified permissions.
function createTicketServer({ authInfo }: { authInfo?: AuthInfo }) {
  const server = new McpServer({ name: "ticket-tools", version: "1.0.0" })

  server.registerTool(
    "get_ticket",
    {
      description: "Read a ticket.",
      inputSchema: z.object({ id: z.string().min(1) }),
    },
    async ({ id }) => {
      if (!authInfo?.scopes.includes("tickets:read"))
        return failure("Forbidden")

      const ticket = getTicket(id)
      if (!ticket) return failure("Ticket not found")

      return { content: [{ type: "text", text: JSON.stringify(ticket) }] }
    },
  )

  server.registerTool(
    "close_ticket",
    {
      description: "Close a ticket.",
      inputSchema: z.object({ id: z.string().min(1) }),
    },
    async ({ id }) => {
      if (!authInfo?.scopes.includes("tickets:write"))
        return failure("Forbidden")

      const ticket = closeTicket(id)
      if (!ticket) return failure("Ticket not found")

      return { content: [{ type: "text", text: JSON.stringify(ticket) }] }
    },
  )

  return server
}

const handler = toNodeHandler(createMcpHandler(createTicketServer))

const app = createMcpExpressApp({
  host: "127.0.0.1",
  allowedHosts: [resource.hostname],
})
// Discovery tells clients where to send the user for login and consent.
app.use(
  mcpAuthMetadataRouter({
    oauthMetadata: metadata,
    resourceServerUrl: resource,
    scopesSupported: ["tickets:read", "tickets:write", "offline_access"],
  }),
)

app.all(
  "/mcp",
  requireBearerAuth({
    verifier,
    resourceMetadataUrl: getOAuthProtectedResourceMetadataUrl(resource),
  }),
  (req, res) => void handler(req, res, req.body),
)

app
  .listen(18480, "127.0.0.1")
  .on("listening", () => console.log(`MCP: ${resource}`))
In createTicketServer, each handler checks its required scope before accessing a ticket. The highlighted checks show why a
read-only token can call get_ticket but cannot call close_ticket.
3. Start the server
In the server terminal, check the server:
npm run check
Start the server. It loads the project settings from .env, so this command also works after reopening the terminal. Run it from
ory-docs/code-examples/mcp-auth/typescript/oauth:
. ./.env
npm start
4. Sign in with read-only access
Keep the server running. Open another terminal window or tab for your MCP client. This is your client terminal. Change to the
ory-docs/code-examples/mcp-auth/typescript/oauth directory, then choose one client and use it throughout:
- Claude Code
- Codex
- MCP Inspector
Add the connection and sign in:
claude mcp add --transport http --callback-port 6275 ticket-tutorial http://127.0.0.1:18480/mcp
claude mcp login ticket-tutorial
If this terminal has no browser, for example over SSH, use this command instead of the preceding login command:
claude mcp login ticket-tutorial --no-browser
- Open the printed URL in a browser on another machine.
- Sign in and choose the consent settings described below.
- Copy the full callback URL from the browser's address bar and paste it at the terminal prompt.
See Claude Code's OAuth setup for details.
Add the connection to your Codex configuration. If ticket-tutorial already exists, remove it first with
codex mcp remove ticket-tutorial. Then sign in:
mkdir -p "${CODEX_HOME:-$HOME/.codex}"
cat >> "${CODEX_HOME:-$HOME/.codex}/config.toml" <<'TOML'

[mcp_servers.ticket-tutorial]
url = "http://127.0.0.1:18480/mcp"
scopes = ["tickets:read", "tickets:write", "offline_access"]
TOML
codex -c mcp_oauth_callback_port=6276 -c 'mcp_oauth_callback_url="http://127.0.0.1:6276/callback"' \
  mcp login ticket-tutorial --scopes tickets:read,tickets:write,offline_access
If this terminal has no browser, for example over SSH, use this command instead of the preceding login command:
codex -c mcp_oauth_callback_port=6276 -c 'mcp_oauth_callback_url="http://127.0.0.1:6276/callback"' \
  mcp login ticket-tutorial --scopes tickets:read,tickets:write,offline_access --no-browser
- Open the printed URL in a browser on another machine.
- Sign in and choose the consent settings described below.
- Copy the full callback URL from the browser's address bar and paste it at the terminal prompt.
See Codex's MCP configuration for details.
MCP Inspector lets you call tools in your browser without an AI subscription. Create its configuration and start it:
jq -n '{mcpServers: {tickets: {
  type: "http",
  url: "http://127.0.0.1:18480/mcp",
  oauth: {
    scopes: "tickets:read tickets:write offline_access",
    requestRefreshToken: true
  }
}}}' > inspector.json
export INSPECTOR_STATE=$(mktemp -d)
HOST=127.0.0.1 CLIENT_PORT=6274 MCP_STORAGE_DIR="$INSPECTOR_STATE" \
  MCP_INSPECTOR_SECRET_STORE=memory \
  npm exec --yes --package @modelcontextprotocol/[email protected] -- \
  mcp-inspector --web --config inspector.json --server tickets
Open the printed URL and turn on the tickets connection switch.
In the browser, register or sign in as a test user. On the consent screen, use these settings:
| Consent choice | Set it to |
|---|---|
| tickets:read | On |
| tickets:write | Off |
Offline Access (offline_access) | On |
| Remember my decision | Unchecked |
tickets:read lets the client read tickets and tickets:write lets it close them. Offline Access lets the client renew its access without another login. Leaving Remember my decision unchecked lets you choose different permissions in step 6.
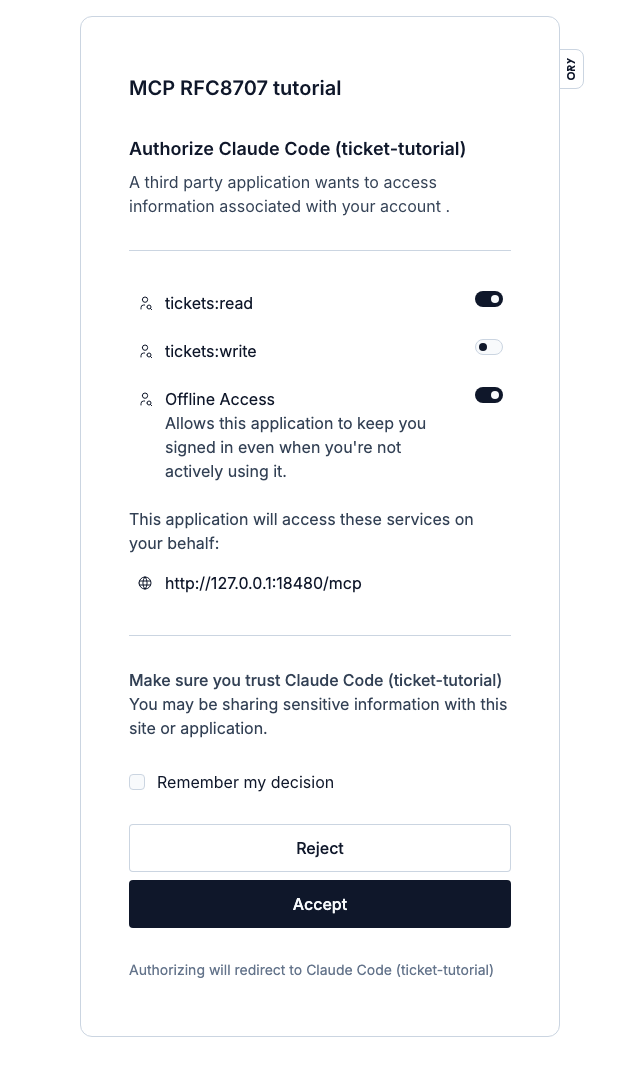
Select Accept, then return to your client and wait for it to confirm the login.
5. Test read-only access
In the client terminal, use your connected client to test the permissions:
- In Claude Code or Codex, start a conversation with
claudeorcodexand run/mcpto confirm thatticket-tutorialis connected. - Ask the agent to perform each action below with
ticket-tutorial, one at a time.
If you use Inspector, open Tools, choose the tool, enter T-100 as id, and select Execute Tool for each action instead.
Approving a tool call in the client is separate from the ticket permissions you granted in the browser.
| Action | Tool | Expected result |
|---|---|---|
| Read ticket T-100. | get_ticket | open |
| Close ticket T-100. | close_ticket | Forbidden |
| Read ticket T-100 again. | get_ticket | Still open |
Forbidden is the intended result: you left tickets:write off.
6. Grant write access
Keep the server running in the server terminal so you continue with the same ticket. In the client terminal, sign in again with your chosen client:
- For Claude Code or Codex, exit the conversation with
/exitand run the login command from step 4 again. - For Inspector, stop it with Ctrl+C and clear its login state with the following command. Then run the Inspector start command from step 4 again.
rm -rf "$INSPECTOR_STATE"
export INSPECTOR_STATE=$(mktemp -d)
- On the consent screen, leave tickets:read and Offline Access on, and turn tickets:write on.
- Leave Remember my decision unchecked and select Accept.
- In the client terminal, start a new Claude Code or Codex conversation so the client uses the new token. For Inspector, wait for Connected.
- Close
T-100and read it again. Its status is nowclosed.
To repeat the exercise, restart the server with npm start to reset the in-memory tickets. All authenticated users share these
tickets; scopes control operations, not which data a user can see.
Troubleshooting
| Symptom | Check |
|---|---|
| Registration is unavailable | Run the configuration check. DCR must be enabled and discovery must advertise your project's /oauth2/register URL. |
invalid_target | The requested resource must match the client's audience exactly, including scheme, host, port, path, and trailing slash. Clients registered before you set the default audience keep their old audience: clear the client's saved registration and sign in again. |
| Login succeeds but the server returns 401 | The token must be a JWT whose aud includes http://127.0.0.1:18480/mcp. Confirm the project uses JWT access tokens. A client registered with its own access-token strategy overrides the project default; create a fresh registration. |
| Consent page does not appear | Revoke remembered consent, then sign in again. Clearing client tokens does not clear remembered consent. |
Check configuration and discovery
Check the configuration
Leave the MCP server running. Open another terminal and change to the ory-docs/code-examples/mcp-auth/typescript/oauth directory
to run these checks.
Check the project settings and that discovery advertises the registration endpoint. Both checks print true:
. ./.env
ory get oauth2-config --project "$ORY_PROJECT_ID" --format json | jq -e '
  .feature_flags.resource_indicators_enabled == true and
  .oidc.dynamic_client_registration.enabled == true and
  .oidc.dynamic_client_registration.default_audience == ["http://127.0.0.1:18480/mcp"] and
  .oidc.dynamic_client_registration.default_scope == ["tickets:read","tickets:write","offline_access"] and
  .strategies.access_token == "jwt"' || {
  printf '%s\n' 'Project must enable RFC 8707, DCR, the tutorial audience and scopes, and JWT access tokens.' >&2
  exit 1
}
curl -fsS "$ORY_SDK_URL/.well-known/openid-configuration" | \
  jq -e --arg registration "$ORY_SDK_URL/oauth2/register" '.registration_endpoint == $registration' || {
  printf '%s\n' 'Discovery must advertise the project /oauth2/register endpoint.' >&2
  exit 1
}
With the server running, check its discovery responses:
curl -i http://127.0.0.1:18480/mcp
curl -fsS http://127.0.0.1:18480/.well-known/oauth-protected-resource/mcp
The first returns HTTP 401 with a resource_metadata challenge. The second identifies the MCP resource and your project as its
authorization server.
Clean up
- In the client terminal, exit your conversation or stop Inspector.
- In the client terminal, remove the client connection with
claude mcp remove ticket-tutorialorcodex mcp remove ticket-tutorial. If you used Inspector, runrm -rf "$INSPECTOR_STATE" inspector.jsoninstead. - In the server terminal, stop the MCP server.
In the server terminal, delete the tutorial's dynamically registered clients. The list shows each client's ID, name, callback URLs, and audience. Enter the IDs of your tutorial clients one at a time:
. ./.env
ory list oauth2-clients --project "$ORY_PROJECT_ID" --format json | \
  jq '.items[] | {client_id, client_name, redirect_uris, audience}'
printf 'Tutorial client ID to delete (repeat for each tutorial registration): '
read -r TUTORIAL_CLIENT_ID
ory delete oauth2-client "$TUTORIAL_CLIENT_ID" --project "$ORY_PROJECT_ID" --yes
unset TUTORIAL_CLIENT_ID
Delete the test identity you created:
. ./.env
ory list identities --project "$ORY_PROJECT_ID" --format json
printf 'Test identity ID to delete: '
read -r TEST_IDENTITY_ID
ory delete identity "$TEST_IDENTITY_ID" --project "$ORY_PROJECT_ID" --yes
In the server terminal, delete the setup files and clear the variables:
rm -f project.json oauth-config.json .env
unset TEST_IDENTITY_ID ORY_PROJECT_ID ORY_SDK_URL
Repeat the unset command in any other terminal where you loaded the project settings. Each terminal keeps its own variables.
Deploy your server
Replace the loopback resource with your server's public HTTPS URL, such as https://mcp.example.com/mcp, in the client
connection, project default audiences, and auth.ts. Existing registrations keep their old audience; see
invalid_target.
The resource URL identifies your server in tokens and discovery. It is not the address the server listens on. The server keeps
listening on 127.0.0.1:18480 and rejects requests whose Host header does not match the resource's host name. Run a reverse
proxy on the same machine that terminates TLS for the public host name and forwards all requests to http://127.0.0.1:18480 with
the original Host header.
The server verifies JWTs locally. Revoking consent stops future refreshes, but an issued JWT still passes verification until it expires. Choose token lifetimes that fit your application, and use token introspection when you need an online status check. See JWT access tokens, MCP authorization, and token audiences in Ory Hydra Authorization.
See the complete OAuth example.