The Ory OSS v25.4.0 release rollout is underway. Discover how Ory’s new unified, calendar-based versioning streamlines upgrades and compatibility across Hydra, Kratos, Keto, and Oathkeeper.
Before we start, let's get some terminology out of the way:
At Ory, identity can mean any actor in a system (user, robot, service account,
...). The term user always refers to a human being sitting in front of a
browser or mobile app.
A session refers to a user's session in a browser or mobile app after they
have authenticated.
Self-Service refers to flows the user can do on their own - such as login,
registration, and so on. It does not require administrative / support
intervention.
The code for this app is available on
GitHub. To give it
a spin, clone it and run the following commands:
git clone https://github.com/ory/kratos-selfservice-ui-react-nextjs.git
cd kratos-selfservice-ui-react-nextjs
npm i
To use your own Ory Kratos instance, you can use the ORY_SDK_URL environment
variable. To get started we recommend to run Ory Kratos in an Ory Project, which
is free for developers. You can create a new project on
console.ory.com or you
via the Ory CLI. Install the
CLI with the package manager of your choice on
Linux,
macOs, or
Windows.
Create a new developer project with just two commands:
# Download the Ory CLI to your local directory:
bash <(curl https://raw.githubusercontent.com/ory/meta/master/install.sh) -b . ory
# install Ory CLI using cURl
./ory auth
# Log into an existing account or create a new one
./ory create project --name <your-project-name>
# Create a new project
After the project has been created the CLI displays the project details:
Project created successfully!
ID            a0c23a9d-bd3b-4a20-a6c0-00a1ada73f49
SLUG	        laughing-ardinghelli-cvaggbj1hi
STATE	        running
NAME	        Example
Copy the SLUG, and set the ORY_SDK_URL to the
SDK URL of the project you just
created:
# If you run Ory Kratos in the Ory Network:
export ORY_SDK_URL=https://YOUR_PROJECT_SLUG_HERE.projects.oryapis.com

# Start the app
npm run dev
Next head over to http://localhost:3000/ to see the
app in action with login, registration - a working user management!
Ory Kratos on your Machine
You can also run Ory Kratos on your own machine and develop in a local
environment. A quick way to begin is to run the
Ory Kratos Docker quickstart as it
includes all the necessary dependencies. You can run Ory Kratos without Docker
as well!
In that case, set the ORY_SDK_URL to your local Ory Kratos instance:
# If you run Ory Kratos locally using the Docker quick start:
export ORY_KRATOS_URL=http://localhost:4455/

# Start the app
npm run dev
Ory Kratos Configuration in the Ory Network
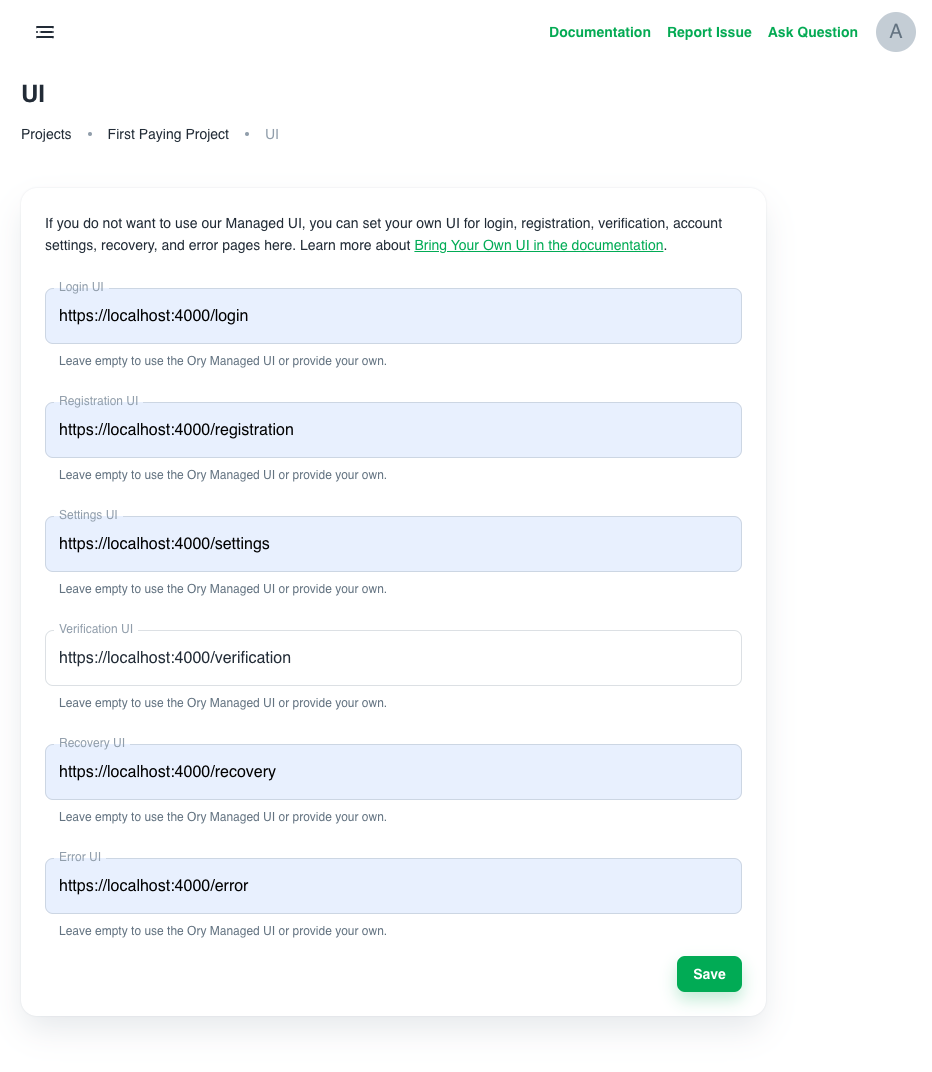
To get everything to work smoothly, we recommend setting the appropriate UI
endpoints in your Ory Network Project under the "User Interface" menu item. If
you are developing locally on port 3000 this would be:
You can also configure this (like all other Ory configuration) directly in the
CLI, for example for the registration UI. Just switch out the flow name to
configure the other UIs:
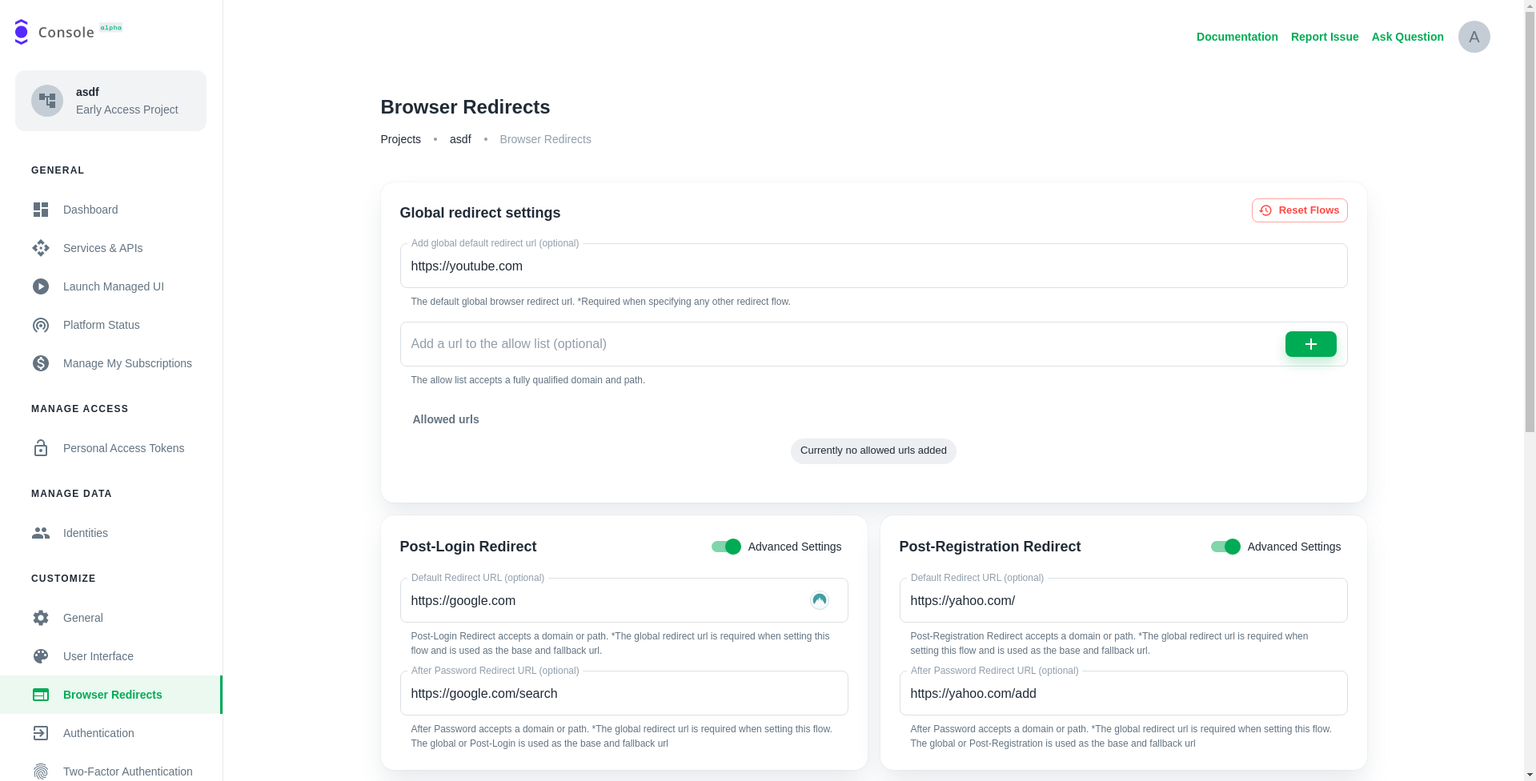
Also, ensure to set up your redirects correctly, so you end up at the right
endpoint after you have signed up or signed in!
We are setting these values to ensure that all flows (e.g. clicking on that
password reset link) end up at your application. If you deploy to production,
set these values to your production URL!
Start with the Next.js Typescript Template
To start from scratch, initialize the NextJS App and install Ory's SDKs and
integration packages:
npx create-next-app --ts
npm i --save @ory/kratos-client @ory/integrations
To make the UI beautiful, we also install Ory's theme package. You can of course
use your own styling framework (e.g. Material UI or
Tailwind).
npm i --save @ory/themes
We also want to send notifications to users in case something goes wrong. For
that, we will install
React Toastify:
npm install --save react-toastify
Adding Next.js Edge Function to Integrate with Ory Kratos
To make everything run smoothly, we will add Ory's integration library and
include it in Next.js Edge Runtime. To do so, add a new file under
pages/api/.ory/[...paths].ts with the following contents:
// @ory/integrations offers a package for integrating with NextJS.import { nextjs } from'@ory/integrations'// We need to export the config.exportconst config = nextjs.config// And create the Ory Cloud API "bridge".exportdefault nextjs.createApiHandler({
fallbackToPlayground: true
})
Setting up the SDK to interact with the Ory Network's APIs is just a few lines
of code:
import { Configuration, V0alpha2Api } from'@ory/client'exportconst ory = newV0alpha2Api(
newConfiguration({
basePath: `/api/.ory`,
// NEVER prefix this with NEXT_PUBLIC or your personal access token will be leaked in your build!accessToken: process.env.ORY_ACCESS_TOKEN
})
)
Rendering the Registration Form
Great, now all the preconditions are met! Let's start with the first page we
want to implement: the registration form!
// ...constRegistration: NextPage = () => {
const router = useRouter()
// The "flow" represents a registration process and contains// information about the form we need to render (e.g. username + password)const [flow, setFlow] = useState<SelfServiceRegistrationFlow>()
// Get ?flow=... from the URLconst { flow: flowId, return_to: returnTo } = router.query// ...
Initializing or Fetching a Registration Flow
Next, we create an effect which will fetch the registration flow and set the
state. The registration flow contains information about the registration form,
e.g. the fields and validation messages to be displayed:
// ...// In this effect we either initiate a new registration flow, or we fetch an existing registration flow.useEffect(() => {
// If the router is not ready yet, or we already have a flow, do nothing.if (!router.isReady || flow) {
return
}
// If ?flow=.. was in the URL, we fetch itif (flowId) {
ory
.getSelfServiceRegistrationFlow(String(flowId))
.then(({ data }) => {
// We received the flow - let's use its data and render the form!setFlow(data)
})
.catch(handleFlowError(router, 'registration', setFlow))
return
}
// Otherwise we initialize it
ory
.initializeSelfServiceRegistrationFlowForBrowsers(
returnTo ? String(returnTo) : undefined
)
.then(({ data }) => {
setFlow(data)
})
.catch(handleFlowError(router, 'registration', setFlow))
}, [flowId, router, router.isReady, returnTo, flow])
// ...
As you can see, if the flow ID is not available, we will initialize a new
registration flow (initializeSelfServiceRegistrationFlowForBrowsers). If it is
set, we will fetch the flow from the API (getSelfServiceRegistrationFlow).
Preparing Registration Form Submission
When the user submits the form, we will call the
submitSelfServiceRegistrationFlow method of the SDK to submit the form:
// ...constonSubmit = (values: SubmitSelfServiceRegistrationFlowBody) =>
router
// On submission, add the flow ID to the URL but do not navigate. This prevents the user loosing// his data when she/he reloads the page.
.push(`/registration?flow=${flow?.id}`, undefined, { shallow: true })
.then(() =>
ory
.submitSelfServiceRegistrationFlow(String(flow?.id), values)
.then(({ data }) => {
// If we ended up here, it means we are successfully signed up!//// You can do cool stuff here, like having access to the identity which just signed up:console.log('This is the user session: ', data, data.identity)
// For now however we just want to redirect home!return router.push(flow?.return_to || '/').then(() => {})
})
.catch(handleFlowError(router, 'registration', setFlow))
.catch((err: AxiosError) => {
// If the previous handler did not catch the error it's most likely a form validation errorif (err.response?.status === 400) {
// Yup, it is!setFlow(err.response?.data)
return
}
returnPromise.reject(err)
// ...
Great, we have now initialized the registration flow and have everything
prepared to render the form. Rendering the form is the same for all flows
(login, registration, recovery, ...). The
<Flow onSubmit={onSubmit} flow={flow} /> React Component
will render the form and handle the form state. The component itself is a bit
longer because we deal with the form state, errors, and the form submission
without any helper tools such as Formik. In essence, it iterates over the
Registration Form's ui.node values which we received from
initializeSelfServiceRegistrationFlowForBrowsers /
getSelfServiceRegistrationFlow earlier:
// ...render() {
const { hideGlobalMessages, flow } = this.propsconst { values, isLoading } = this.state// Filter the nodes - only show the ones we wantconst nodes = this.filterNodes()
if (!flow) {
// No flow was set yet? It's probably still loading...//// Nodes have only one element? It is probably just the CSRF Token// and the filter did not match any elements!returnnull
}
return (
<formaction={flow.ui.action}method={flow.ui.method}onSubmit={this.handleSubmit}
>
{!hideGlobalMessages ? <Messagesmessages={flow.ui.messages} /> : null}
{nodes.map((node, k) => {
const id = getNodeId(node) as keyof Values
return (
<Nodekey={`${id}-${k}`}
disabled={isLoading}node={node}value={values[id]}dispatchSubmit={this.handleSubmit}setValue={(value) =>
new Promise((resolve) => {
this.setState(
(state) => ({
...state,
values: {
...state.values,
[getNodeId(node)]: value
}
}),
resolve
)
})
}
/>
)
})}
</form>// ...
Then, for each node, it decides what HTML input to render:
import { UiNode, UiNodeInputAttributes } from'@ory/client'import { Button, Checkbox, TextInput } from'@ory/themes'import { getLabel } from'./helpers'interfaceProps {
node: UiNodeattributes: UiNodeInputAttributesvalue: anydisabled: booleansetValue: (value: string | number | boolean) =>void
}
exportconstNodeInput = ({
node,
attributes,
value = '',
setValue,
disabled
}: Props) => {
// Some attributes have dynamic JavaScript - this is for example required for WebAuthn.//// Unfortunately, there is currently no other way than to run eval here.constonClick = () => {
if (attributes.onclick) {
const run = newFunction(attributes.onclick)
run()
}
}
switch (attributes.type) {
case'hidden':
// Render a hidden input fieldreturn (
<inputtype={attributes.type}name={attributes.name}value={attributes.value || 'true'}
/>
)
case'checkbox':
// Render a checkbox. We have one hidden element which is the real value (true/false), and one// display element which is the toggle value (true)!return (
<><inputvalue={attributes.value ? 'true' : 'false'}
type="hidden"name={attributes.name}
/><Checkboxname={attributes.name}value="true"disabled={attributes.disabled || disabled}
label={getLabel(node)}state={node.messages.find(({ type }) => type === 'error')
? 'error'
: undefined
}
subtitle={node.messages.map(({ text }) => text).join('\n')}
/>
</>
)
case'button':
// Render a buttonreturn (
<Buttonname={attributes.name}onClick={onClick}value={attributes.value || 'true'}
disabled={attributes.disabled || disabled}
>
{getLabel(node)}
</Button>
)
case'submit':
// Render the submit buttonreturn (
<Buttontype="submit"name={attributes.name}onClick={onClick}value={attributes.value || 'true'}
disabled={attributes.disabled || disabled}
>
{getLabel(node)}
</Button>
)
}
// Render a generic text input field.return (
<TextInputtitle={node.meta.label?.text}onClick={onClick}onChange={(e) => {
setValue(e.target.value)
}}
type={attributes.type}
name={attributes.name}
value={value}
disabled={attributes.disabled || disabled}
help={node.messages.length > 0}
state={
node.messages.find(({ type }) => type === 'error') ? 'error' : undefined
}
subtitle={
<>
{node.messages.map(({ text, id }) => (
<spandata-testid={`ui.node.message.${id}`}>{text}</span>
))}
</>
}
/>
)
}
The simplest HTML input to render is the hidden input field. Basically you just
add the attributes to the HTML element:
import { getNodeLabel } from'@ory/integrations/ui'import { Button, TextInput } from'@ory/themes'import { NodeInputButton } from'./NodeInputButton'import { NodeInputCheckbox } from'./NodeInputCheckbox'import { NodeInputHidden } from'./NodeInputHidden'import { NodeInputSubmit } from'./NodeInputSubmit'import { NodeInputProps } from'./helpers'exportfunctionNodeInputDefault<T>(props: NodeInputProps) {
const { node, attributes, value = '', setValue, disabled } = props
// Some attributes have dynamic JavaScript - this is for example required for WebAuthn.constonClick = () => {
// This section is only used for WebAuthn. The script is loaded via a <script> node// and the functions are available on the global window level. Unfortunately, there// is currently no better way than executing eval / function here at this moment.if (attributes.onclick) {
const run = newFunction(attributes.onclick)
run()
}
}
// Render a generic text input field.return (
<TextInputtitle={node.meta.label?.text}onClick={onClick}onChange={(e) => {
setValue(e.target.value)
}}
type={attributes.type}
name={attributes.name}
value={value}
disabled={attributes.disabled || disabled}
help={node.messages.length > 0}
state={
node.messages.find(({ type }) => type === 'error') ? 'error' : undefined
}
subtitle={
<>
{node.messages.map(({ text, id }, k) => (
<spankey={`${id}-${k}`} data-testid={`ui/message/${id}`}>
{text}
</span>
))}
</>
}
/>
)
}
Ory Kratos' forms can contain several types of nodes:
These are needed to show, for example, QR codes for TOTP, scripts for WebAuthn,
text for recovery codes, buttons for social sign in, and so on!
Dealing With Flow Errors
Usually, Ory Kratos takes care of redirecting to the correct endpoints and
showing the right messages. With Single Page Apps though you need to deal with
errors yourself. Ory Kratos conveniently returns error IDs which you can use to
identify errors and handle accordingly:
import { AxiosError } from'axios'import { NextRouter } from'next/router'import { Dispatch, SetStateAction } from'react'import { toast } from'react-toastify'// A small function to help us deal with errors coming from fetching a flow.exportfunction handleGetFlowError<S>(
router: NextRouter,
flowType: 'login' | 'registration' | 'settings' | 'recovery' | 'verification',
resetFlow: Dispatch<SetStateAction<S | undefined>>
) {
returnasync (err: AxiosError) => {
switch (err.response?.data.error?.id) {
case'session_aal2_required':
// 2FA is enabled and enforced, but user did not perform 2fa yet!window.location.href = err.response?.data.redirect_browser_toreturncase'session_already_available':
// User is already signed in, let's redirect them home!await router.push('/')
returncase'session_refresh_required':
// We need to re-authenticate to perform this actionwindow.location.href = err.response?.data.redirect_browser_toreturncase'self_service_flow_return_to_forbidden':
// The flow expired, let's request a new one.
toast.error('The return_to address is not allowed.')
resetFlow(undefined)
await router.push('/' + flowType)
returncase'self_service_flow_expired':
// The flow expired, let's request a new one.
toast.error('Your interaction expired, please fill out the form again.')
resetFlow(undefined)
await router.push('/' + flowType)
returncase'security_csrf_violation':
// A CSRF violation occurred. Best to just refresh the flow!
toast.error(
'A security violation was detected, please fill out the form again.'
)
resetFlow(undefined)
await router.push('/' + flowType)
returncase'security_identity_mismatch':
// The requested item was intended for someone else. Let's request a new flow...resetFlow(undefined)
await router.push('/' + flowType)
returncase'browser_location_change_required':
// Ory Kratos asked us to point the user to this URL.window.location.href = err.response.data.redirect_browser_toreturn
}
switch (err.response?.status) {
case410:
// The flow expired, let's request a new one.resetFlow(undefined)
await router.push('/' + flowType)
return
}
// We are not able to handle the error? Return it.returnPromise.reject(err)
}
}
// A small function to help us deal with errors coming from initializing a flow.exportconst handleFlowError = handleGetFlowError
Rendering the Recovery Page
Rendering the recovery form is the same as the registration form, but with a few
minor changes:
import {
SelfServiceRecoveryFlow,
SubmitSelfServiceRecoveryFlowBody
} from'@ory/kratos-client'import { CardTitle } from'@ory/themes'import { AxiosError } from'axios'importtype { NextPage } from'next'importHeadfrom'next/head'importLinkfrom'next/link'import { useRouter } from'next/router'import { useEffect, useState } from'react'import { Flow, ActionCard, CenterLink, MarginCard } from'../pkg'import { handleFlowError } from'../pkg/errors'import ory from'../pkg/sdk'constRecovery: NextPage = () => {
const [flow, setFlow] = useState<SelfServiceRecoveryFlow>()
// Get ?flow=... from the URLconst router = useRouter()
const { flow: flowId, return_to: returnTo } = router.queryuseEffect(() => {
// If the router is not ready yet, or we already have a flow, do nothing.if (!router.isReady || flow) {
return
}
// If ?flow=.. was in the URL, we fetch itif (flowId) {
ory
.getSelfServiceRecoveryFlow(String(flowId))
.then(({ data }) => {
setFlow(data)
})
.catch(handleFlowError(router, 'recovery', setFlow))
return
}
// Otherwise we initialize it
ory
.initializeSelfServiceRecoveryFlowForBrowsers()
.then(({ data }) => {
setFlow(data)
})
.catch(handleFlowError(router, 'recovery', setFlow))
.catch((err: AxiosError) => {
// If the previous handler did not catch the error it's most likely a form validation errorif (err.response?.status === 400) {
// Yup, it is!setFlow(err.response?.data)
return
}
returnPromise.reject(err)
})
}, [flowId, router, router.isReady, returnTo, flow])
constonSubmit = (values: SubmitSelfServiceRecoveryFlowBody) =>
router
// On submission, add the flow ID to the URL but do not navigate. This prevents the user loosing// his data when she/he reloads the page.
.push(`/recovery?flow=${flow?.id}`, undefined, { shallow: true })
.then(() =>
ory
.submitSelfServiceRecoveryFlow(String(flow?.id), undefined, values)
.then(({ data }) => {
// Form submission was successful, show the message to the user!setFlow(data)
})
.catch(handleFlowError(router, 'recovery', setFlow))
.catch((err: AxiosError) => {
switch (err.response?.status) {
case400:
// Status code 400 implies the form validation had an errorsetFlow(err.response?.data)
return
}
throw err
})
)
return (
<><Head><title>Recover your account - Ory NextJS Integration Example</title><metaname="description"content="NextJS + React + Vercel + Ory" /></Head><MarginCard><CardTitle>Recover your account</CardTitle><FlowonSubmit={onSubmit}flow={flow} /></MarginCard><ActionCard><Linkhref="/"passHref><CenterLink>Go back</CenterLink></Link></ActionCard></>
)
}
exportdefaultRecovery
Rendering the Verification Page
Rendering the verification form is the same as the registration form, but with a
few minor changes:
import {
SelfServiceVerificationFlow,
SubmitSelfServiceVerificationFlowBody
} from'@ory/kratos-client'import { Card, CardTitle } from'@ory/themes'import { AxiosError } from'axios'importtype { NextPage } from'next'importHeadfrom'next/head'importLinkfrom'next/link'import { useRouter } from'next/router'import { useEffect, useState } from'react'import ory from'../pkg/sdk'import { ActionCard, CenterLink, MarginCard } from'../pkg/styled'import { Flow } from'../pkg/ui/Flow'constVerification: NextPage = () => {
const [flow, setFlow] = useState<SelfServiceVerificationFlow>()
// Get ?flow=... from the URLconst router = useRouter()
const { flow: flowId } = router.queryuseEffect(() => {
if (!router.isReady) {
return
}
// If ?flow=.. was in the URL, we fetch itif (flowId) {
ory
.getSelfServiceVerificationFlow(String(flowId))
.then(({ data }) => {
setFlow(data)
})
.catch((err: AxiosError) => {
switch (err.response?.status) {
case410:
// Status code 410 means the request has expired - so let's load a fresh flow!case403:
// Status code 403 implies some other issue (e.g. CSRF) - let's reload!return router.push('/verification')
}
throw err
})
return
}
// Otherwise we initialize it
ory
.initializeSelfServiceVerificationFlowForBrowsers()
.then(({ data }) => {
setFlow(data)
})
.catch((err: AxiosError) => {
switch (err.response?.status) {
case400:
// Status code 400 implies the user is already signed inreturn router.push('/')
}
throw err
})
}, [flowId, router, router.isReady])
constonSubmit = (values: SubmitSelfServiceVerificationFlowBody) =>
router
// On submission, add the flow ID to the URL but do not navigate. This prevents the user loosing// his data when she/he reloads the page.
.push(`/verification?flow=${flow?.id}`, undefined, { shallow: true })
.then(() =>
ory
.submitSelfServiceVerificationFlow(
String(flow?.id),
undefined,
values
)
.then(({ data }) => {
// Form submission was successful, show the message to the user!setFlow(data)
})
.catch((err: AxiosError) => {
switch (err.response?.status) {
case400:
// Status code 400 implies the form validation had an errorsetFlow(err.response?.data)
return
}
throw err
})
)
return (
<><Head><title>Verify your account - Ory NextJS Integration Example</title><metaname="description"content="NextJS + React + Vercel + Ory" /></Head><MarginCard><CardTitle>Verify your account</CardTitle><FlowonSubmit={onSubmit}flow={flow} /></MarginCard><ActionCard><Linkhref="/"passHref><CenterLink>Go back</CenterLink></Link></ActionCard></>
)
}
exportdefaultVerification
Rendering the Account Settings Page
Rendering the account settings form is the same as the registration form, but
with a few minor changes:
import {
SelfServiceSettingsFlow,
SubmitSelfServiceRegistrationFlowBody,
SubmitSelfServiceSettingsFlowBody
} from'@ory/kratos-client'import { CardTitle, H3, P } from'@ory/themes'import { AxiosError } from'axios'importtype { NextPage } from'next'importHeadfrom'next/head'importLinkfrom'next/link'import { useRouter } from'next/router'import { ReactNode, useEffect, useState } from'react'import ory from'../pkg/sdk'import { ActionCard, CenterLink } from'../pkg/styled'import { Flow, Methods } from'../pkg/ui/Flow'import { Messages } from'../pkg/ui/Messages'interfaceProps {
flow?: SelfServiceSettingsFlowonly?: Methods
}
functionSettingsCard({
flow,
only,
children
}: Props & { children: ReactNode }) {
if (!flow) {
returnnull
}
const nodes = only
? flow.ui.nodes.filter(({ group }) => group === only)
: flow.ui.nodesif (nodes.length === 0) {
returnnull
}
return<ActionCardwide>{children}</ActionCard>
}
constSettings: NextPage = () => {
const [flow, setFlow] = useState<SelfServiceSettingsFlow>()
// Get ?flow=... from the URLconst router = useRouter()
const { flow: flowId } = router.queryuseEffect(() => {
if (!router.isReady) {
return
}
// If ?flow=.. was in the URL, we fetch itif (flowId) {
ory
.getSelfServiceSettingsFlow(String(flowId))
.then(({ data }) => {
setFlow(data)
})
.catch((err: AxiosError) => {
switch (err.response?.status) {
case410:
// Status code 410 means the request has expired - so let's load a fresh flow!case403:
// Status code 403 implies some other issue (e.g. CSRF) - let's reload!return router.push('/settings')
}
throw err
})
return
}
// Otherwise we initialize it
ory.initializeSelfServiceSettingsFlowForBrowsers().then(({ data }) => {
setFlow(data)
})
}, [flowId, router, router.isReady])
constonSubmit = (values: SubmitSelfServiceSettingsFlowBody) =>
router
// On submission, add the flow ID to the URL but do not navigate. This prevents the user loosing// his data when she/he reloads the page.
.push(`/settings?flow=${flow?.id}`, undefined, { shallow: true })
.then(() => {
ory
.submitSelfServiceSettingsFlow(String(flow?.id), undefined, values)
.then(({ data }) => {
// The settings have been saved and the flow was updated. Let's show it to the user!setFlow(data)
})
.catch((err: AxiosError) => {
switch (err.response?.status) {
case400:
// Status code 400 implies the form validation had an errorsetFlow(err.response?.data)
return
}
throw err
})
})
return (
<><Head><title>
Profile Management and Security Settings - Ory NextJS Integration
Example
</title><metaname="description"content="NextJS + React + Vercel + Ory" /></Head><CardTitlestyle={{marginTop:80 }}>
Profile Management and Security Settings
</CardTitle><SettingsCardonly="profile"flow={flow}><H3>Profile Settings</H3><Messagesmessages={flow?.ui.messages} /><FlowhideGlobalMessagesonSubmit={onSubmit}only="profile"flow={flow}
/></SettingsCard><SettingsCardonly="password"flow={flow}><H3>Change Password</H3><Messagesmessages={flow?.ui.messages} /><FlowhideGlobalMessagesonSubmit={onSubmit}only="password"flow={flow}
/></SettingsCard><SettingsCardonly="oidc"flow={flow}><H3>Manage Social Sign In</H3><Messagesmessages={flow?.ui.messages} /><FlowhideGlobalMessagesonSubmit={onSubmit}only="oidc"flow={flow} /></SettingsCard><SettingsCardonly="lookup_secret"flow={flow}><H3>Manage 2FA Backup Recovery Codes</H3><Messagesmessages={flow?.ui.messages} /><P>
Recovery codes can be used in panic situations where you have lost
access to your 2FA device.
</P><FlowhideGlobalMessagesonSubmit={onSubmit}only="lookup_secret"flow={flow}
/></SettingsCard><SettingsCardonly="totp"flow={flow}><H3>Manage 2FA TOTP Authenticator App</H3><P>
Add a TOTP Authenticator App to your account to improve your account
security. Popular Authenticator Apps are{' '}
<ahref="https://www.lastpass.com"rel="noreferrer"target="_blank">
LastPass
</a>{' '}
and Google Authenticator (
<ahref="https://apps.apple.com/us/app/google-authenticator/id388497605"target="_blank"rel="noreferrer"
>
iOS
</a>
,{' '}
<ahref="https://play.google.com/store/apps/details?id=com.google.android.apps.authenticator2&hl=en&gl=US"target="_blank"rel="noreferrer"
>
Android
</a>
).
</P><Messagesmessages={flow?.ui.messages} /><FlowhideGlobalMessagesonSubmit={onSubmit}only="totp"flow={flow} /></SettingsCard><SettingsCardonly="webauthn"flow={flow}><H3>Manage Hardware Tokens and Biometrics</H3><Messagesmessages={flow?.ui.messages} /><P>
Use Hardware Tokens (e.g. YubiKey) or Biometrics (e.g. FaceID,
TouchID) to enhance your account security.
</P><FlowhideGlobalMessagesonSubmit={onSubmit}only="webauthn"flow={flow}
/></SettingsCard><ActionCardwide><Linkhref="/"passHref><CenterLink>Go back</CenterLink></Link></ActionCard></>
)
}
exportdefaultSettings
Rendering the Login Page
The login page is a bit more work to render! That is because we want to support
two-step authentication and we need to deal with any two-factor authentication
errors by e.g. logging the user out.
import {
SelfServiceLoginFlow,
SubmitSelfServiceLoginFlowBody
} from'@ory/kratos-client'import { CardTitle } from'@ory/themes'import { AxiosError } from'axios'importtype { NextPage } from'next'importHeadfrom'next/head'importLinkfrom'next/link'import { useRouter } from'next/router'import { useEffect, useState } from'react'import {
ActionCard,
CenterLink,
createLogoutHandler,
Flow,
MarginCard
} from'../pkg'import { handleGetFlowError, handleFlowError } from'../pkg/errors'import ory from'../pkg/sdk'constLogin: NextPage = () => {
const [flow, setFlow] = useState<SelfServiceLoginFlow>()
// Get ?flow=... from the URLconst router = useRouter()
const {
return_to: returnTo,
flow: flowId,
// Refresh means we want to refresh the session. This is needed, for example, when we want to update the password// of a user.
refresh,
// AAL = Authorization Assurance Level. This implies that we want to upgrade the AAL, meaning that we want// to perform two-factor authentication/verification.
aal
} = router.query// This might be confusing, but we want to show the user an option// to sign out if they are performing two-factor authentication!const onLogout = createLogoutHandler([aal, refresh])
useEffect(() => {
// If the router is not ready yet, or we already have a flow, do nothing.if (!router.isReady || flow) {
return
}
// If ?flow=.. was in the URL, we fetch itif (flowId) {
ory
.getSelfServiceLoginFlow(String(flowId))
.then(({ data }) => {
setFlow(data)
})
.catch(handleGetFlowError(router, 'login', setFlow))
return
}
// Otherwise we initialize it
ory
.initializeSelfServiceLoginFlowForBrowsers(
Boolean(refresh),
aal ? String(aal) : undefined,
returnTo ? String(returnTo) : undefined
)
.then(({ data }) => {
setFlow(data)
})
.catch(handleFlowError(router, 'login', setFlow))
}, [flowId, router, router.isReady, aal, refresh, returnTo, flow])
constonSubmit = (values: SubmitSelfServiceLoginFlowBody) =>
router
// On submission, add the flow ID to the URL but do not navigate. This prevents the user loosing// his data when she/he reloads the page.
.push(`/login?flow=${flow?.id}`, undefined, { shallow: true })
.then(() =>
ory
.submitSelfServiceLoginFlow(String(flow?.id), undefined, values)
// We logged in successfully! Let's bring the user home.
.then((res) => {
if (flow?.return_to) {
window.location.href = flow?.return_toreturn
}
router.push('/')
})
.then(() => {})
.catch(handleFlowError(router, 'login', setFlow))
.catch((err: AxiosError) => {
// If the previous handler did not catch the error it's most likely a form validation errorif (err.response?.status === 400) {
// Yup, it is!setFlow(err.response?.data)
return
}
returnPromise.reject(err)
})
)
return (
<><Head><title>Sign in - Ory NextJS Integration Example</title><metaname="description"content="NextJS + React + Vercel + Ory" /></Head><MarginCard><CardTitle>
{(() => {
if (flow?.forced) {
return 'Confirm Action'
} else if (flow?.requested_aal === 'aal2') {
return 'Two-Factor Authentication'
}
return 'Sign In'
})()}
</CardTitle><FlowonSubmit={onSubmit}flow={flow} /></MarginCard>
{aal || refresh ? (
<ActionCard><CenterLinkdata-testid="logout-link"onClick={onLogout}>
Log out
</CenterLink></ActionCard>
) : (
<><ActionCard><Linkhref="/registration"passHref><CenterLink>Create account</CenterLink></Link></ActionCard><ActionCard><Linkhref="/recover"passHref><CenterLink>Recover your account</CenterLink></Link></ActionCard></>
)}
</>
)
}
exportdefaultLogin
Form Rendering Conclusion
That was quite a bit of code, but it's all there is to it! If you do not want to
implement these UI screens yourself, use the reference implementations for Ory
Kratos instead, or clone this repository and use it as a base for your project!
The easiest way to deploy your Next.js app is to use the
Vercel Platform from the creators of Next.js. If you
have never deployed on Vercel, check out the
Next.js deployment documentation for more
details. Deploying the app is easy. Ensure that your build works by running
npm run build
Then, set up your Vercel account and create a new app.
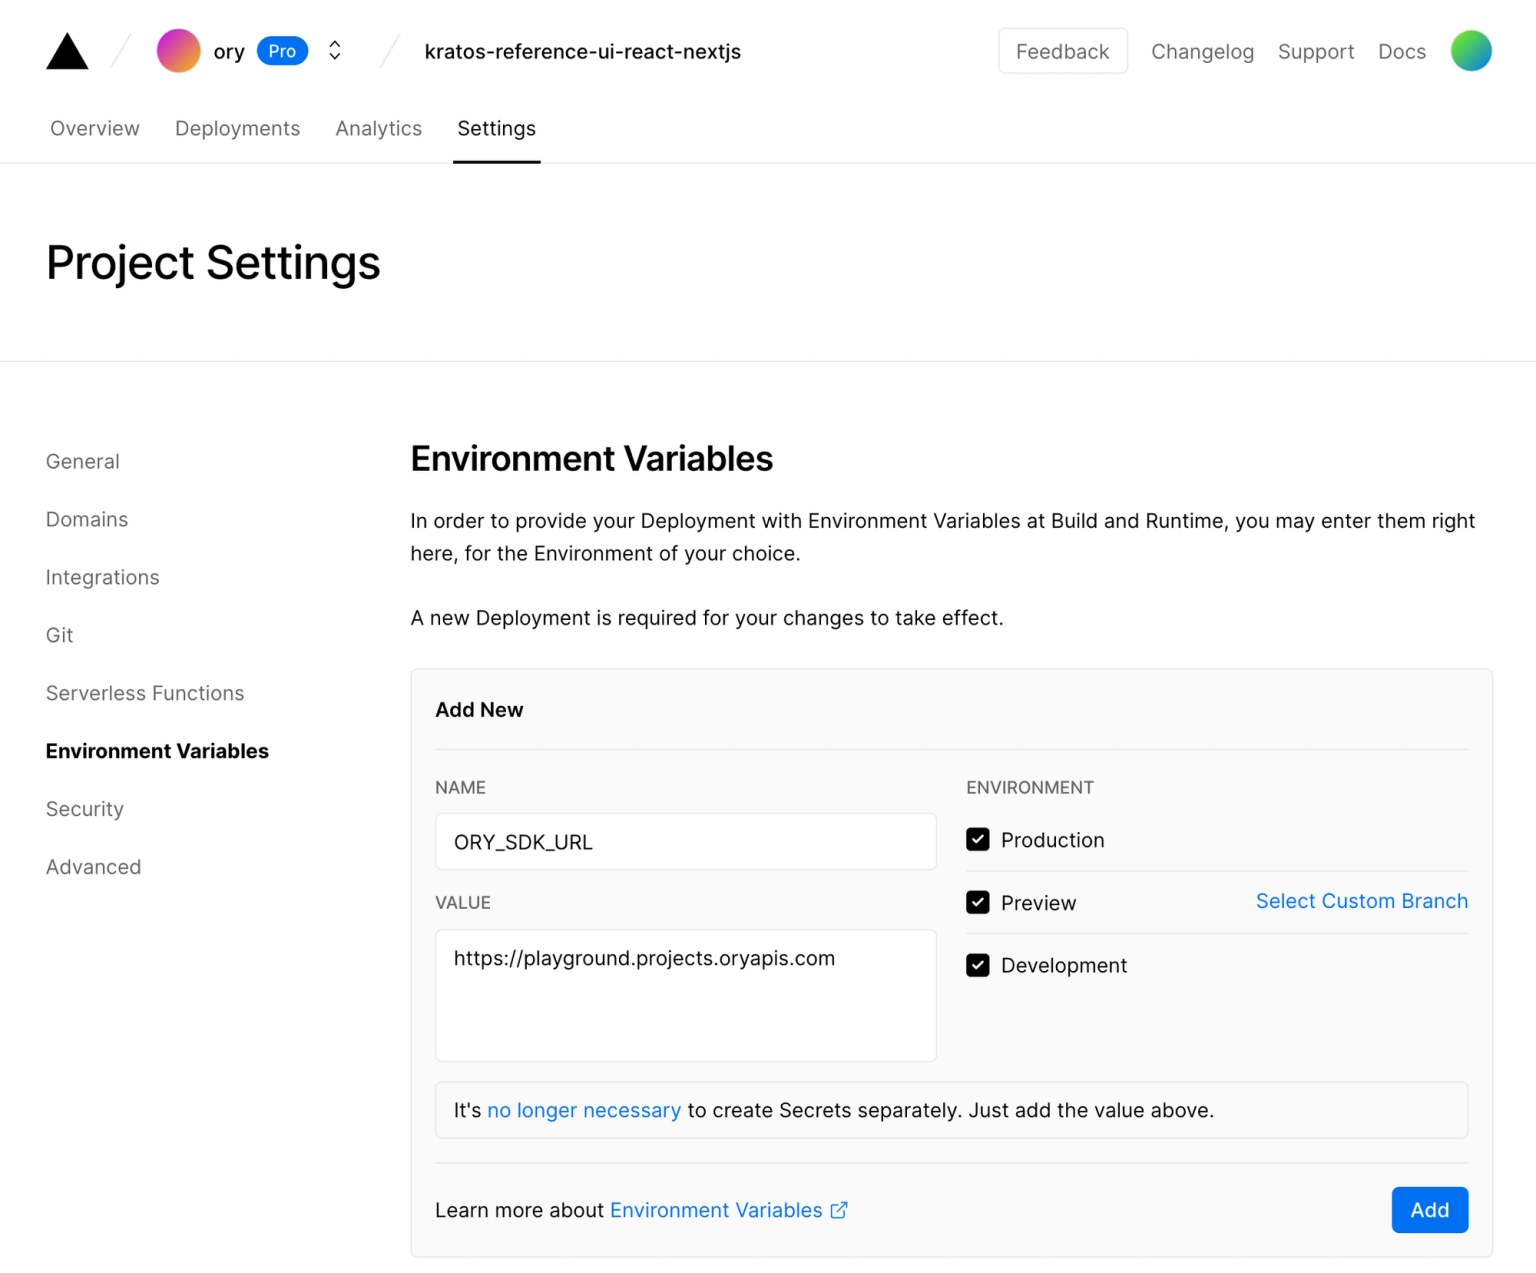
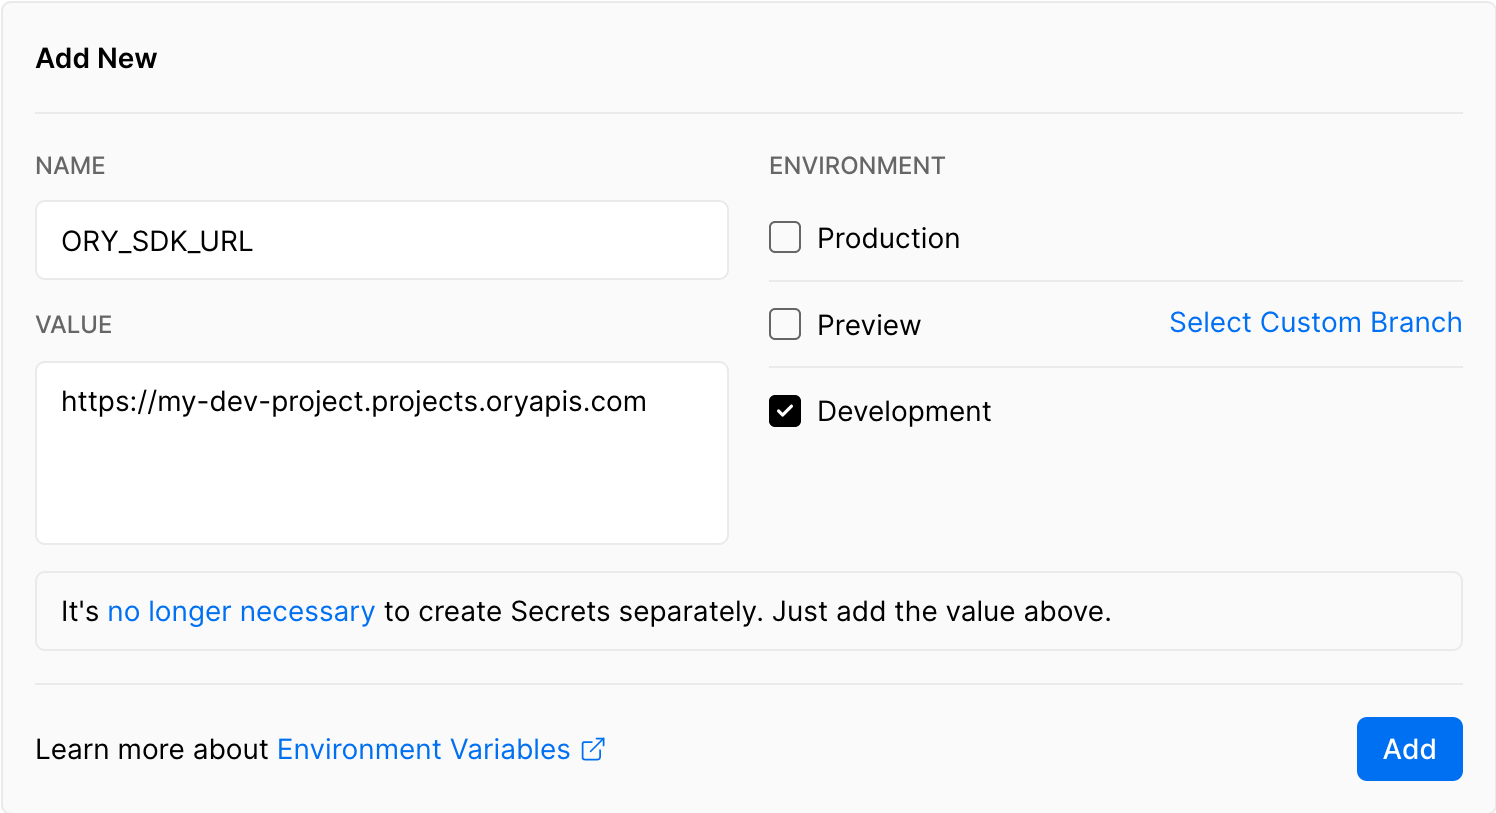
You will need to configure your
the Ory Network Project SDK URL
or the URL of your self-hosted Ory Kratos instance in your Vercel deployment:
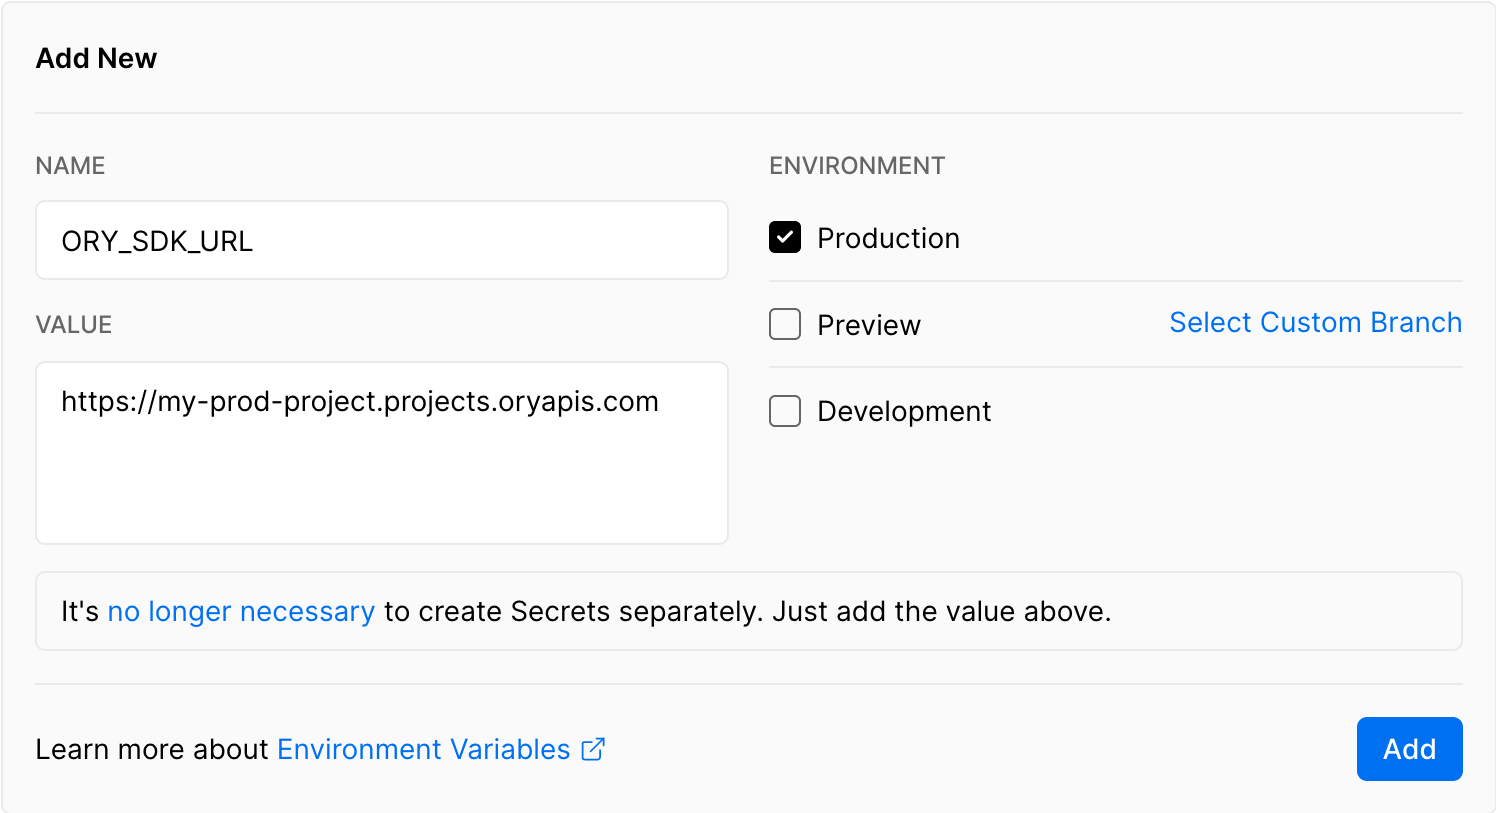
By the way! If you want to use separate Ory Kratos deployments for staging,
production, and development then use different SDK URLs for the different
environments by un/selecting the checkboxes in the Vercel UI:
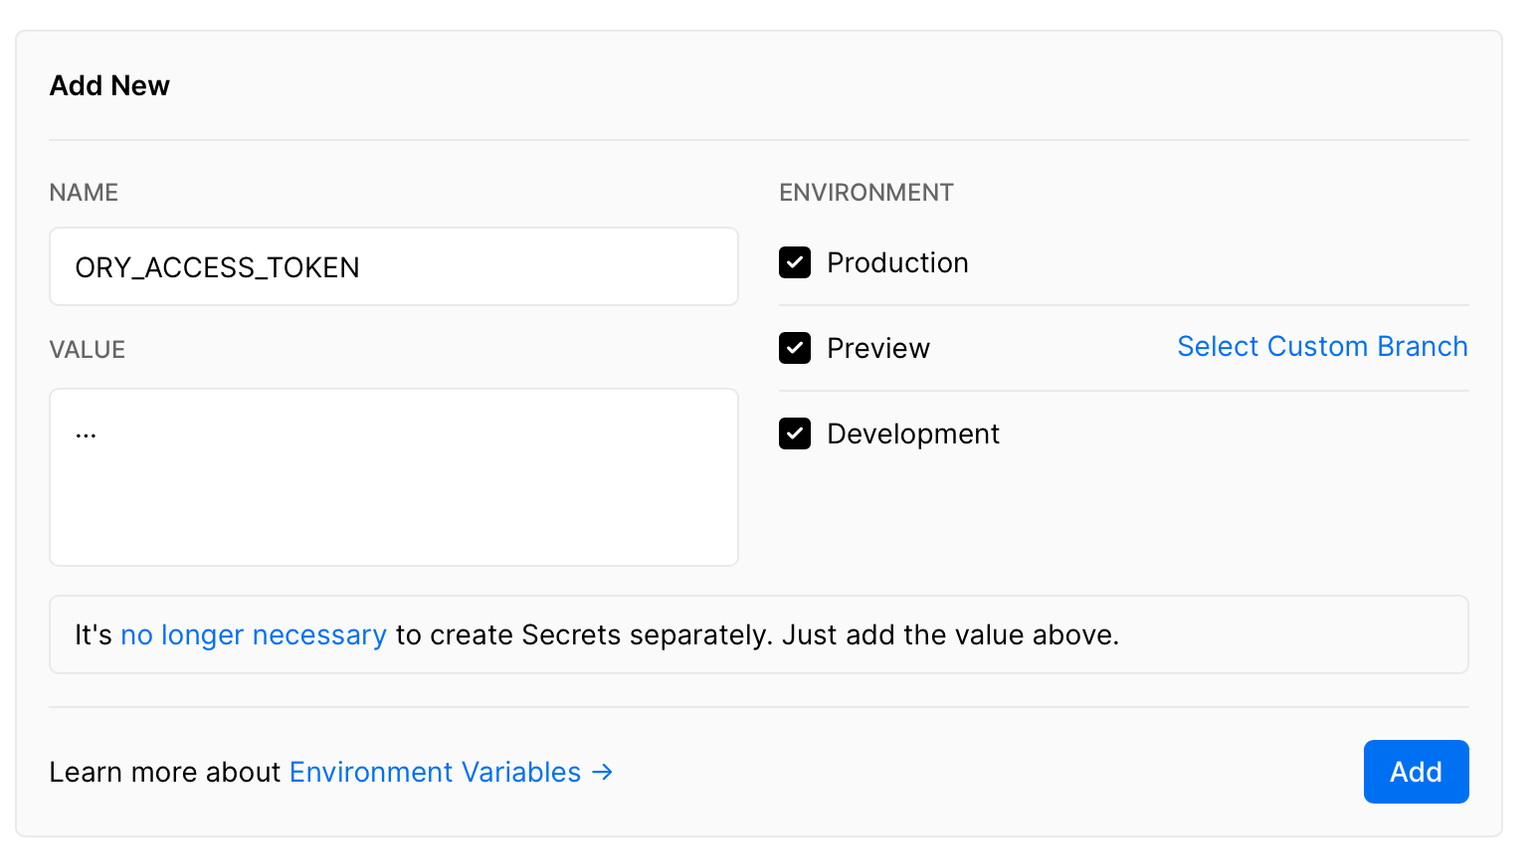
If you want to call the Ory Network's Admin APIs from your Next.js Edge
serverless functions, optionally set up the
Ory Personal Access Token:
Next all you need to do is to run the deploy command and connect it to the
project you created:
npx vercel deploy --prod
This also works with Vercel PR Preview!
End-to-End Tests
Adding end-to-end tests is also easy! Clone the repository and run the following
commands:
git clone https://github.com/ory/kratos-selfservice-ui-react-nextjs.git
cd kratos-selfservice-ui-react-nextjs
npm i
Then, depending on your setup, you can either use Ory Kratos local or in Ory
Cloud:
The GitHub Action file is also straight forward and contains two configurations,
one for running Ory Kratos locally and one for running Ory Kratos in the Ory
Network:
name: RunTestson:
pull_request:
push:
branches:
- main
- master
# Runthis test every day to catchany regressions.
schedule:
- cron: "0 0 * * *"jobs:
production:
runs-on: ubuntu-latest
steps:
- uses: actions/checkout@v2
- uses: actions/setup-node@v2with:
node-version: "16"
- run: npm ci
- run: npm run format:check
- run: npm run build
- run: |
npm run start &
npm run test
env:
ORY_KRATOS_URL: https://playground.projects.oryapis.com/staging:
runs-on: ubuntu-latest
steps:
- uses: actions/checkout@v2
- uses: actions/setup-node@v2with:
node-version: "16"
- run: npm ci
- run: npm run format:check
- run: npm run build
- run: |
npm run start &
npm run test
env:
ORY_KRATOS_URL: https://blissful-greider-9hmtg26xai.projects.staging.oryapis.dev/
self-hosted:
runs-on: ubuntu-latest
steps:
- uses: actions/checkout@v2
- uses: actions/setup-node@v2with:
node-version: "16"
- run: npm ci
- run: npm run format:check
- run: npm run build
- run: |
git clone --depth 1 --branch master https://github.com/ory/kratos.git ../kratos
cd ../kratos
git checkout master
make docker
docker-compose -f quickstart.yml -f quickstart-latest.yml -f contrib/quickstart/kratos/cloud/quickstart.yml up --build --force-recreate -d
- run: |
npm run start &
npm run test
env:
ORY_KRATOS_URL: http://localhost:4455
Conclusion
Adding login and registration to your Next.js app is a breeze with open source
technology like Ory Kratos and
Next.js.
We hope you enjoyed this guide and found it helpful! If you have any questions,
check out the Ory community on Slack and
GitHub!