Follow the step-by-step guide to add authentication to your
React Native application and screens for:
- login
- registration
- profile management
- update password
- recover password
- verify account
The examples use Ory Kratos, an open source
identity and authentication REST API server written in Golang.
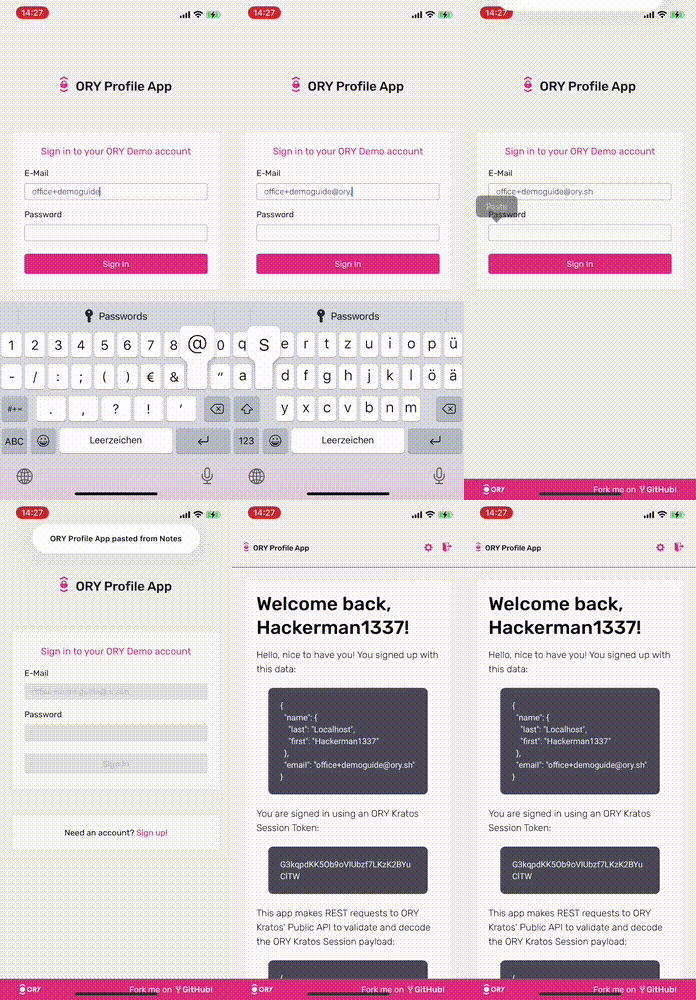
Authentication for React Native Mobile App with Screens for Login, Registration and User Management API using Ory Kratos as a backend.
As the user storage / identity management we will use the open source
Ory Kratos project. The
React Native application shown in the screens below
is available on
github.com/ory/kratos-selfservice-ui-react-native
as well. Both are maintained by @aeneasr and
@zepatrik.
You can download the React Native example app right now from the
Apple App Store!
In the future, this guide will also cover Two-Factor-Authentication (2FA/MFA),
"Sign in with Google", password reset, email verification, phone number and SMS
verification, "Sign in with GitHub", "Sign in with Facebook" and many other
flows.
Authentication for React Native using Expo
This guide assumes that you have worked with ReactJS and
React Native before as we will not cover React fundamentals and focus on
implementing login, registration, and so on.
To make things a bit easier, we will use expo. At a
minimum, you need NodeJS and NPM installed locally. We will use the Ory Kratos
React Native Login, Registration and Profile Management template:
npm install -g expo-cli
expo init login-signup-app -t @ory/expo-login-registration-template --npm

# We also want to install and initialize all required components:
cd login-signup-app
npm i
npm run expo-install
# For iOS you also need to run:
npm run pod-install
In case you just want to start exploring, simply run:
npm start opens a dashboard where you can open iOS, Android, or web.npm run android opens the app as an android app (requires a connected
android VM or device).npm run ios opens the app in the iOS simulator (works only on Mac OSX).npm run web opens the app as a browser app.
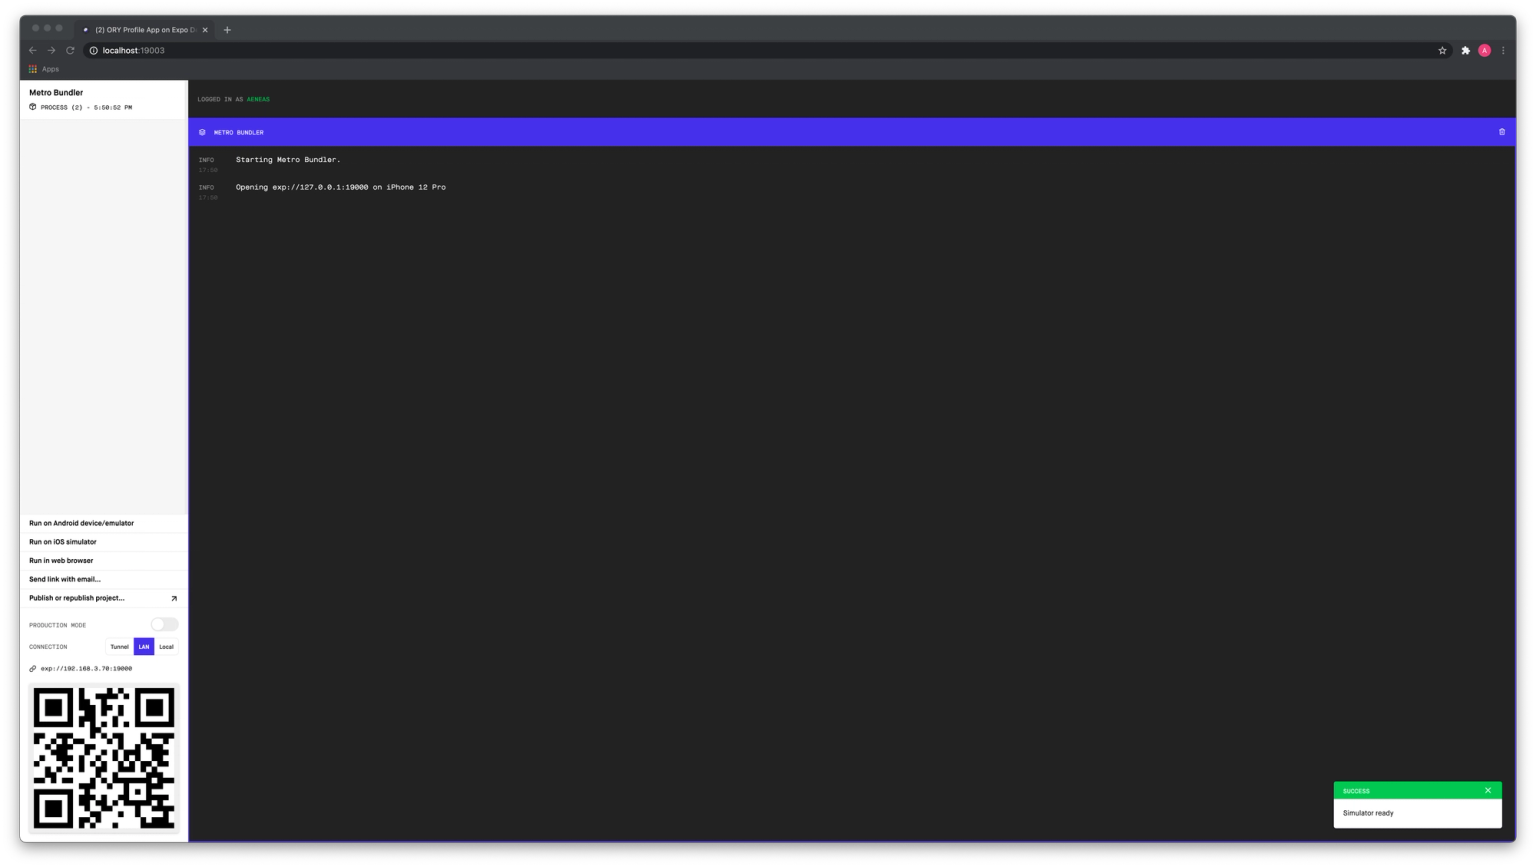
Running these commands directly will use our hosted demo environment of Ory
Kratos at
playground.projects.oryapis.com.
Configure this in app.config.js:
export default (parent = {}) => {
const { config = {} } = parent
const { env = {} } = process || {}
const {
KRATOS_URL = "https://playground.projects.oryapis.com",
SENTRY_DSN = "https://[email protected]/5530799",
} = env
return {
...config,
extra: {
kratosUrl: KRATOS_URL,
sentryDsn: SENTRY_DSN,
},
}
}
:::info
Please be aware that the demo environment including its admin APIs is available
to everyone. Use only anonymised data when playing around with it! If you want
your own managed environment reach out to [email protected]
or set up your own open source environment. Information on achieving that is
available in part two of this article.
:::
React Native Profile Management and Update Password Flow
This short screen capture shows using the apps' user login, user registration,
dashboard, and profile management features:
User Management and Identity Management Admin API
To manage identities, use the Ory Kratos CLI. An overview of all commands can be
found in the
Ory Kratos documentation. Because
we are using the playground in this example, we will use the
Ory CLI instead as it allows to connect to Ory.
docker run oryd/ory:v0.0.57 help
To list all identities in the system, run:
# A public access token to manage the Ory playground project!
export ORY_ACCESS_TOKEN=eGWGK00ZoEZHuEpvARqxGvo1FDNkumLo
docker run \
  -e ORY_ACCESS_TOKEN=$ORY_ACCESS_TOKEN \
  oryd/ory:v0.0.57 \
  identities \
  list

ID					VERIFIED ADDRESS 1		RECOVERY ADDRESS 1		SCHEMA ID	SCHEMA URL
f9c33e56-5b43-458a-8cfa-f38a4fb98b9c	[email protected]		[email protected]		default		https://demo.tenants.staging.oryapis.dev/api/kratos/public/schemas/default
[...]
You can also search for the identity you just signed up using jq:
yourEmail=<the-email-you-used-for-signup>
# For example:
#   [email protected]
export ORY_ACCESS_TOKEN=eGWGK00ZoEZHuEpvARqxGvo1FDNkumLo
docker run \
  -e ORY_ACCESS_TOKEN=$ORY_ACCESS_TOKEN \
  oryd/ory:v0.0.57 \
  identities \
  list \
  --format json | \
    jq '.[] | select(.traits.email == "'$yourEmail'")'

{
  "id": "f9c33e56-5b43-458a-8cfa-f38a4fb98b9c",
  "recovery_addresses": [
    {
      "id": "bd7c396c-d893-4a2b-8627-b50aa38e2569",
      "value": "[email protected]",
      "via": "email"
    }
  ],
  "schema_id": "default",
  "schema_url": "https://demo.tenants.staging.oryapis.dev/api/kratos/public/schemas/default",
  "traits": {
    "email": "[email protected]",
    "name": {
      "first": "Aeneas",
      "last": "Hackerman"
    }
  },
  "verifiable_addresses": [
    {
      "id": "bee9b276-b57f-41dc-8c61-82eb83c2d4fd",
      "status": "completed",
      "value": "[email protected]",
      "verified": true,
      "verified_at": "2020-11-26T08:45:22.094Z",
      "via": "email"
    }
  ]
}
To learn more about administration of Ory Kratos' identities, head over to the
Managing Users and Identities Documentation!
JSON Web Tokens versus Ory Kratos Session Tokens
Ory Kratos does not issue JSON Web Tokens but instead so-called opaque Ory
Kratos Session Tokens. You can still convert those tokens to JSON Web Tokens if
you want, but Ory Kratos Session Tokens are more secure because:
- JSON Web Tokens can not hold secrets: Unless encrypted, JSON Web Tokens
can be read by everyone, including 3rd Parties. Therefore, they can not keep
secrets.
- JSON Web Tokens can not be revoked / invalidated / logged out: Well, you
can revoke them, but they will be considered valid until the "expiry" of the
token is reached. Unless, of course, you have a blacklist or check with Hydra
if the token was revoked, which however defeats the purpose of using JSON Web
Tokens in the first place.
Run Ory Kratos Login, Registration, 2FA Server Locally in Docker
Instead of using the hosted demo environment, you can also deploy your Ory
Kratos installation locally and run the React Native app against its API. To run
the app against a local deployment, check out
Ory Kratos locally and run the quickstart:
# You might want to cd into another directory:
#   cd ..

git clone https://github.com/ory/kratos.git
cd kratos
git checkout v0.5.4-alpha.1
docker-compose -f quickstart.yml -f quickstart-standalone.yml \
  up --build --force-recreate -d
Next you need to set up port forwarding for the Ory Kratos Docker Image you just
started. We use the tool ngrok.
$ ngrok http 4433

Account                       ...
Version                       ...
Region                        ...
Web Interface                 ...
Forwarding                    ...
Forwarding                    https://04ee3e08367a.ngrok.io -> http://localhost:4433

Connections                   ttl     opn     rt1     rt5     p50     p90
                              0       0       0.00    0.00    0.00    0.00
Copy the HTTPS forwarding URL (example from above
https://04ee3e08367a.ngrok.io) and in a new terminal, set it as an environment
variable and start the app:
# Change into the directory of your react native app:
cd login-signup-app
KRATOS_URL=<the-ngrok-url> npm start

# For example:
#   KRATOS_URL=https://04ee3e08367a.ngrok.io npm start
Now your app will use the local deployment of Ory Kratos with your own database!
React Navigation with Authentication Session
The entry point for the app is
App.tsx.
Besides loading some fonts and setting up the views, this component includes the
structure of the application - including the navigation:
export default function App() {
const [robotoLoaded] = useFontsRoboto({ Roboto_400Regular })
const [rubikLoaded] = useFontsRubik({
Rubik_300Light,
Rubik_400Regular,
Rubik_500Medium,
})
const hydratedTheme = {
...theme,
regularFont300: rubikLoaded ? "Rubik_300Light" : "Arial",
regularFont400: rubikLoaded ? "Rubik_400Regular" : "Arial",
regularFont500: rubikLoaded ? "Rubik_500Medium" : "Arial",
codeFont400: robotoLoaded ? "Roboto_400Regular" : "Arial",
platform: "react-native",
}
return (
<ThemeProvider theme={hydratedTheme}>
<NativeThemeProvider theme={hydratedTheme}>
<SafeAreaProvider>
<SafeAreaView
edges={["top", "left", "right"]}
style={{
flex: 1,
backgroundColor: theme.grey5,
}}
>
<ProjectProvider>
<AuthProvider>
<ErrorBoundary>
<Navigation />
<ForkMe />
</ErrorBoundary>
</AuthProvider>
</ProjectProvider>
</SafeAreaView>
</SafeAreaProvider>
</NativeThemeProvider>
</ThemeProvider>
)
}
The most interesting component here is the <AuthProvider>. This component adds
an authentication / login context to the React Native component tree:
export default function AuthContextProvider({ children }: AuthContextProps) {
const { sdk } = useContext(ProjectContext)
const [sessionContext, setSessionContext] = useState<
SessionContext | undefined
>(undefined)
useEffect(() => {
getAuthenticatedSession().then(syncSession)
}, [])
const syncSession = async (auth: { session_token?: string } | null) => {
if (!auth?.session_token) {
return setAuth(null)
}
try {
const { data: session } = await sdk
.toSession({ xSessionToken: auth.session_token })
setSessionContext({ session, session_token: auth.session_token })
} catch (err: any) {
if (err.response?.status === 401) {
} else {
console.error(err)
}
setSessionContext(null)
}
}
const setAuth = (session: SessionContext) => {
if (!session) {
return killAuthenticatedSession().then(() => setSessionContext(session))
}
setAuthenticatedSession(session).then(() => syncSession(session))
}
if (sessionContext === undefined) {
return null
}
return (
<AuthContext.Provider
value={{
// The session information
session: sessionContext?.session,
sessionToken: sessionContext?.session_token,
// Is true when the user has a session
isAuthenticated: Boolean(sessionContext?.session_token),
// Fetches the session from the server
syncSession: () => getAuthenticatedSession().then(syncSession),
// Allows to override the session
setSession: setAuth,
// Is true if we have fetched the session.
didFetch: true,
}}
>
{children}
</AuthContext.Provider>
)
}
The helper methods in
src/helpers/auth.tsx
are simple wrappers around Expo's
SecureStore. In order
to work on the web as well, we use
@react-native-community/async-storage
as a fallback:
export const getAuthenticatedSession = (): Promise<SessionContext> => {
const parse = (sessionRaw: string | null): SessionContext => {
if (!sessionRaw) {
return null
}
return JSON.parse(sessionRaw)
}
let p = AsyncStore.getItem(userSessionName)
if (Platform.OS !== "web") {
p = SecureStore.getItemAsync(userSessionName)
}
return p.then(parse)
}
export const setAuthenticatedSession = (
session: SessionContext,
): Promise<void> => {
if (!session) {
return killAuthenticatedSession()
}
if (Platform.OS === "web") {
return AsyncStore.setItem(userSessionName, JSON.stringify(session))
}
return (
SecureStore
.setItemAsync(userSessionName, JSON.stringify(session))
)
}
export const killAuthenticatedSession = () => {
if (Platform.OS === "web") {
return AsyncStore.removeItem(userSessionName)
}
return SecureStore.deleteItemAsync(userSessionName)
}
That's all it takes to make the magic happen! Everything else is handled by the
Ory Kratos' Session Token.
We now have a place to store and refresh the user session. In addition, we have
a way to see if the user session is still active in the navigation and show the
dashboard or login / registration screens:
export default () => {
const { isAuthenticated } = useContext(AuthContext)
return (
<KeyboardAvoidingView
style={{ flex: 1 }}
behavior={Platform.OS == "ios" ? "padding" : "height"}
>
<TouchableWithoutFeedback onPress={Keyboard.dismiss}>
<NavigationContainer linking={linking}>
<Stack.Navigator
screenOptions={{
headerShown: isAuthenticated,
}}
>
<Stack.Screen name="Home" component={Home} options={options} />
<Stack.Screen
name="Settings"
component={Settings}
options={options}
/>
<Stack.Screen name="Registration" component={Registration} />
<Stack.Screen name="Login" component={Login} initialParams={{}} />
<Stack.Screen name="Verification" component={Verification} />
<Stack.Screen name="Callback" component={Callback} />
<Stack.Screen name="Recovery" component={Recovery} />
</Stack.Navigator>
</NavigationContainer>
</TouchableWithoutFeedback>
<View data-testid={"flash-message"}>
<FlashMessage position="top" floating />
</View>
</KeyboardAvoidingView>
)
}
React Native Authentication Screens
Let's take a look at the different screens: To avoid writing a form renderer for
every component - including styling - we abstracted the form rendering into
their own components, which you can find in
src/components/Layout/AuthLayout.tsx.
There isn't anything special happening there, but you can have a look if you
intend to change the layout for example.
React Native Login Component Example
The User Login component uses the Ory Kratos TypeScript SDK and the
User Login API Flow.
const Login = ({ navigation, route }: Props) => {
const { project } = useContext(ProjectContext)
const { setSession, sessionToken } = useContext(AuthContext)
const [flow, setFlow] = useState<LoginFlow | undefined>(undefined)
const initializeFlow = () =>
newOrySdk(project)
.createNativeLoginFlow({
aal: route.params.aal,
refresh: route.params.refresh,
xSessionToken: sessionToken,
returnTo: AuthSession.makeRedirectUri({
preferLocalhost: true,
path: "/Callback",
}),
returnSessionTokenExchangeCode: true,
})
.then(({ data: f }) => setFlow(f))
.catch(logSDKError)
const refetchFlow = () =>
newOrySdk(project)
.getLoginFlow({ id: flow!.id })
.then(({ data: f }) => setFlow({ ...flow, ...f }))
.catch(logSDKError)
useFocusEffect(
React.useCallback(() => {
initializeFlow()
return () => {
setFlow(undefined)
}
}, [project]),
)
const setSessionAndRedirect = (session: SessionContext) => {
setSession(session)
setTimeout(() => {
navigation.navigate("Home")
}, 100)
}
const onSubmit = (payload: UpdateLoginFlowBody) =>
flow
? newOrySdk(project)
.updateLoginFlow({
flow: flow.id,
updateLoginFlowBody: payload,
xSessionToken: sessionToken,
})
.then(({ data }) => Promise.resolve(data as SessionContext))
.then(setSessionAndRedirect)
.catch(
handleFormSubmitError(
flow,
setFlow,
initializeFlow,
setSessionAndRedirect,
refetchFlow,
),
)
: Promise.resolve()
return (
<AuthLayout>
<StyledCard>
<AuthSubTitle>Sign in to your account</AuthSubTitle>
<SelfServiceFlow flow={flow} onSubmit={onSubmit} />
</StyledCard>
<NavigationCard
testID="nav-signup"
description="Need an account?"
cta="Sign up!"
onPress={() => navigation.navigate("Registration")}
/>
<NavigationCard
testID="nav-recover"
description="Forgot your password?"
cta="Reset it!"
onPress={() => navigation.navigate("Recovery")}
/>
<ProjectPicker />
</AuthLayout>
)
}
export default Login
React Native Registration Component Example
The User Registration component performs a
User Registration API Flow.
const Registration = ({ navigation }: Props) => {
const [flow, setFlow] = useState<RegistrationFlow | undefined>(undefined)
const { project } = useContext(ProjectContext)
const { setSession, isAuthenticated } = useContext(AuthContext)
const initializeFlow = () =>
newOrySdk(project)
.createNativeRegistrationFlow({
returnTo: AuthSession.makeRedirectUri({
preferLocalhost: true,
path: "/Callback",
}),
returnSessionTokenExchangeCode: true,
})
.then(({ data: flow }) => {
setFlow(flow)
console.log("Setting registration flow", flow)
})
.catch(logSDKError)
useFocusEffect(
useCallback(() => {
if (isAuthenticated) {
navigation.navigate("Home")
return
}
initializeFlow()
return () => setFlow(undefined)
}, [project]),
)
const refetchFlow = () =>
newOrySdk(project)
.getRegistrationFlow({ id: flow!.id })
.then(({ data: f }) => setFlow({ ...flow, ...f }))
.catch(logSDKError)
const setSessionAndRedirect = (session: SessionContext) => {
setSession(session)
setTimeout(() => {
navigation.navigate("Home")
}, 100)
}
const onSubmit = async (
payload: UpdateRegistrationFlowBody,
): Promise<void> => {
if (!flow) {
return
}
newOrySdk(project)
.updateRegistrationFlow({
flow: flow.id,
updateRegistrationFlowBody: payload,
})
.then(({ data }) => {
if (!data.session_token || !data.session) {
const err = new Error(
"It looks like you configured Ory Idnetities to not issue a session automatically after registration. This edge-case is currently not supported in this example app. You can find more information on enabling this feature here: https://www.ory.com/kratos/docs/next/self-service/flows/user-registration#successful-registration",
)
return Promise.reject(err)
}
const s: SessionContext = {
session: data.session,
session_token: data.session_token,
}
let verificationFlow = false
if (data.continue_with) {
for (const c of data.continue_with) {
switch (c.action) {
case "show_verification_ui": {
console.log("got a verfification flow, navigating to it", c)
verificationFlow = true
navigation.navigate("Verification", {
flowId: c.flow.id,
})
break
}
case "set_ory_session_token": {
console.log(
"found an ory session token, storing it for further use",
)
s.session_token = c.ory_session_token
break
}
}
}
}
setSession(s)
if (!verificationFlow) {
navigation.navigate("Home")
}
})
.catch(
handleFormSubmitError(
flow,
setFlow,
initializeFlow,
setSessionAndRedirect,
refetchFlow,
),
)
}
if (!flow) {
return null
}
return (
<RegistrationUI navigation={navigation} flow={flow} onSubmit={onSubmit} />
)
}
type RegistrationUIProps = {
flow: RegistrationFlow
onSubmit: (payload: UpdateRegistrationFlowBody) => Promise<void>
navigation: Props["navigation"]
}
function RegistrationUI({ flow, onSubmit, navigation }: RegistrationUIProps) {
return (
<AuthLayout>
<StyledCard>
<AuthSubTitle>Create an account</AuthSubTitle>
<SelfServiceFlow
textInputOverride={(field, props) => {
switch (getNodeId(field)) {
case "traits.email":
return {
autoCapitalize: "none",
autoCompleteType: "email",
textContentType: "username",
autoCorrect: false,
}
case "password":
const iOS12Plus =
Platform.OS === "ios" &&
parseInt(String(Platform.Version), 10) >= 12
return {
textContentType: iOS12Plus ? "newPassword" : "password",
secureTextEntry: true,
}
}
return props
}}
flow={flow}
onSubmit={onSubmit}
/>
</StyledCard>
<NavigationCard
description="Already have an account?"
cta="Sign in!"
onPress={() => navigation.navigate("Login", {})}
/>
<ProjectPicker />
</AuthLayout>
)
}
export default Registration
React Navigation Home Component Example
The Home component receives the user's authentication session and displays all
relevant information. To learn more about Ory Kratos' Identity and User
Management check out the
Ory Kratos Identity Data Model.
const Home = ({ navigation }: Props) => {
const { isAuthenticated, session, sessionToken } = useContext(AuthContext)
useEffect(() => {
if (!isAuthenticated || !session) {
navigation.navigate("Login", {})
}
}, [isAuthenticated, sessionToken])
if (!isAuthenticated || !session) {
return null
}
const traits = session.identity?.traits
const first = traits.name?.first || traits.email || session.identity?.id
return (
<Layout>
<StyledCard>
<StyledText style={{ marginBottom: 14 }} variant="h1">
Welcome back, {first}!
</StyledText>
<StyledText variant="lead">
Hello, nice to have you! You signed up with this data:
</StyledText>
<CodeBox>{JSON.stringify(traits || "{}", null, 2)}</CodeBox>
<StyledText variant="lead">
You are signed in using an Ory Session Token:
</StyledText>
<CodeBox testID="session-token">{sessionToken}</CodeBox>
<StyledText variant="lead">
This app makes REST requests to Ory Identities' Public API to validate
and decode the Ory Session payload:
</StyledText>
<CodeBox testID="session-content">
{JSON.stringify(session || "{}", null, 2)}
</CodeBox>
</StyledCard>
</Layout>
)
}
export default Home
React Navigation User Settings Component Example
The User Settings component performs a
User Settings API Flow.
const Settings = ({ navigation, route }: Props) => {
const { sdk } = useContext(ProjectContext)
const { isAuthenticated, sessionToken, setSession, syncSession } =
useContext(AuthContext)
const [flow, setFlow] = useState<SettingsFlow | undefined>(undefined)
useEffect(() => {
if (!sessionToken || !isAuthenticated) {
navigation.navigate("Login", {})
return
}
if (route?.params?.flowId) {
fetchFlow(sdk, sessionToken, route.params.flowId)
.then(setFlow)
.catch(logSDKError)
} else {
initializeFlow(sdk, sessionToken).then(setFlow).catch(logSDKError)
}
}, [sdk, sessionToken])
if (!flow || !sessionToken) {
return null
}
const onSuccess = (result: SettingsFlow) => {
if (result.continue_with) {
for (const c of result.continue_with) {
switch (c.action) {
case "show_verification_ui": {
console.log("got a verification flow, navigating to it", c)
navigation.navigate("Verification", {
flowId: c.flow.id,
})
break
}
}
}
}
if (result.state === SettingsFlowState.Success) {
syncSession().then(() => {
showMessage({
message: "Your changes have been saved",
type: "success",
})
})
}
setFlow(result)
}
const onSubmit = (payload: UpdateSettingsFlowBody) =>
sdk
.updateSettingsFlow({
flow: flow.id,
xSessionToken: sessionToken,
updateSettingsFlowBody: payload,
})
.then(({ data }) => {
onSuccess(data)
})
.catch(
handleFormSubmitError(
undefined,
setFlow,
() => initializeFlow(sdk, sessionToken).then,
() => setSession(null),
async () => {},
),
)
return (
<Layout>
<StyledCard testID={"settings-password"}>
<CardTitle>
<StyledText variant={"h2"}>Change password</StyledText>
</CardTitle>
<SelfServiceFlow flow={flow} only="password" onSubmit={onSubmit} />
</StyledCard>
<StyledCard testID={"settings-profile"}>
<CardTitle>
<StyledText variant={"h2"}>Profile settings</StyledText>
</CardTitle>
<SelfServiceFlow flow={flow} only="profile" onSubmit={onSubmit} />
</StyledCard>
{flow?.ui.nodes.find(({ group }) => group === "totp") ? (
<StyledCard testID={"settings-totp"}>
<CardTitle>
<StyledText variant={"h2"}>2FA authenticator</StyledText>
</CardTitle>
<SelfServiceFlow flow={flow} only="totp" onSubmit={onSubmit} />
</StyledCard>
) : null}
{flow?.ui.nodes.find(({ group }) => group === "lookup_secret") ? (
<StyledCard testID={"settings-lookup"}>
<CardTitle>
<StyledText variant={"h2"}>Backup recovery codes</StyledText>
</CardTitle>
<SelfServiceFlow
flow={flow}
only="lookup_secret"
onSubmit={onSubmit}
/>
</StyledCard>
) : null}
</Layout>
)
}
export default Settings
Adding Authentication to a React Native App From Scratch
Granted, using a template is the easiest way to get started. However,
understanding how everything works even better. Let's have a look at the project
set up process!
Assuming that you ran expo init with one of the default templates:
expo init login-signup-app --npm
cd login-signup-app
React Navigation with Authentication
To set up screen navigation, we use the standard React Native navigation
component:
npm install @react-navigation/native @react-navigation/stack
expo install react-native-reanimated react-native-gesture-handler react-native-screens react-native-safe-area-context @react-native-community/masked-view
React Native with Expo Encrypted Credentials Storage
We will use
expo-secure-store to
securely store the user's session key in the encrypted device store (Android
Keystore / Expo Secure Store). To install it we need to run:
expo install expo-secure-store @react-native-community/async-storage

# For iOS you also need to run:
npx pod-install
We're also adding @react-native-community/async-storage because
expo-secure-store does not work on the Web.
Ory Kratos SDKs for React Native
We also need to install the Ory Kratos SDK. We'll also be making sure the app
looks beautiful by installing the Ory Themes package and some fonts later.
# The package "url" is needed as it is not natively available in React Native.
npm install @ory/[email protected] url
React Native Environment Variable Support
Next we want to set up support for environment variables which we will use in
the next section. You can either
follow the Expo guide on Environment Variables
or do the following:
expo install expo-constants
Create a file called app.config.js in the project's root:
export default (parent = {}) => {
const { config = {} } = parent
const { env = {} } = process || {}
const {
KRATOS_URL = "https://playground.projects.oryapis.com",
SENTRY_DSN = "https://[email protected]/5530799",
} = env
return {
...config,
extra: {
kratosUrl: KRATOS_URL,
sentryDsn: SENTRY_DSN,
},
}
}
You can use this variable when initializing the Ory Kratos SDK:
import { Configuration, FrontendApi } from "@ory/client"
import axios from "axios"
import Constants from "expo-constants"
const canonicalize = (url: string = "") => url.replace(/\/+$/, "")
export const kratosUrl = (project: string = "playground") => {
const url = canonicalize(Constants.expoConfig?.extra?.kratosUrl) || ""
if (url.indexOf("https://playground.projects.oryapis.com/") == -1) {
return url
}
return url.replace("playground.", `${project}.`)
}
export const newOrySdk = (project: string) =>
new FrontendApi(
new Configuration({
basePath: kratosUrl(project),
baseOptions: {
withCredentials: false,
timeout: 10000,
},
}),
"",
axios,
)
Fonts and Other Dependencies
To make things a bit prettier, we are going to add the
Ory Theme and some fonts:
npm install @ory/themes styled-components
expo install expo font @expo-google-fonts/rubik \
    @expo-google-fonts/roboto expo-status-bar
You are of course free to use your own themes for this but for the sake of
completeness we added this to the guide.
Conclusion
We have now implemented Ory Kratos Authentication with Login, Registration,
Profile Management in React Native!
Thanks for taking the time to follow this guide and hopefully it helps you build
secure apps more smoothly. Should you have further questions or feedback, visit
the community forum or
chat.
Ory Kratos is open-source and freely available on
github, please consider starring the
repository. It is free and helps grow the project and community.
Sign up to
our newsletter
to be notified of new updates to Ory Kratos and other Ory projects.